

The TrikdisConfig user interface: menus, buttons, status bar
The TrikdisConfig start window has every important function in one place: the menu bar, the four main buttons, configuration without a device, remote access and the status bar. This article explains what each of them is for.
- 7 min read
- 12.11.2026
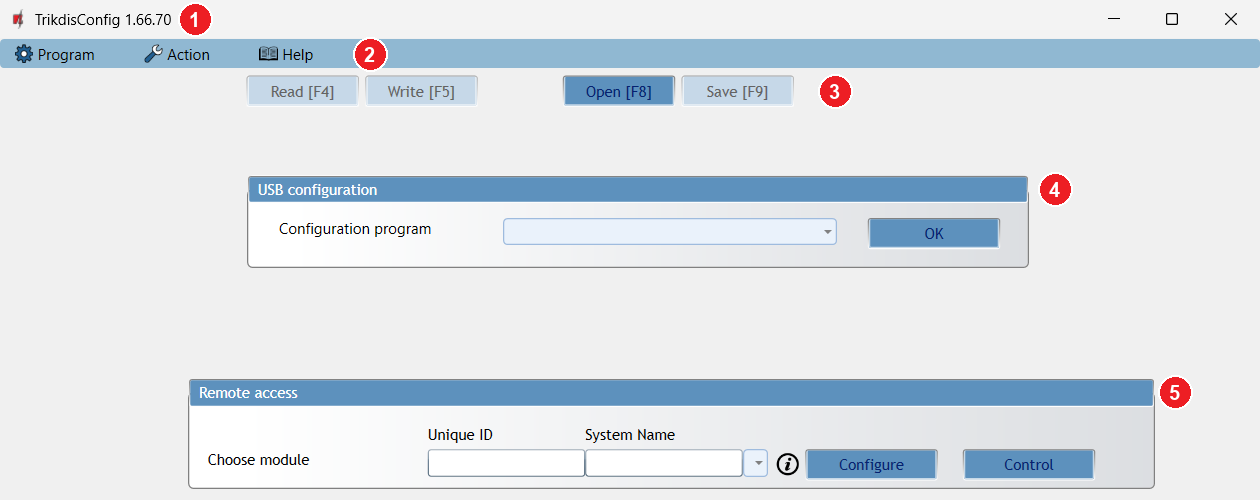
The top left corner of the window shows the program name and version (for example TrikdisConfig 1.66.70). Below it are the menu bar, the button bar, two boxes and, at the bottom of the window, the status bar.
1. Menu bar
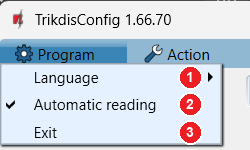
The menu bar has three menus:
- Program
- Language – the program language.
- Automatic reading – when ticked and TrikdisConfig is open, connecting a device with a USB cable makes the program read its settings automatically.
- Exit.
- Action – the list of operations you can perform with the program.
- The most common ones are always visible as buttons below the menu bar (section 2).
- Firmware updates and restoring the default settings are covered in a separate article of the series.
- Help
- About.
- What's new – new features and fixes in each version of the program.


Warning
While the device is connected to a computer via USB cable, it is in programming mode: its normal operation stops, it does not monitor, does not report, cannot be controlled, is powered from USB, and restarts once the cable is unplugged. Therefore the device must not be freely accessible: keep it in a closed metal enclosure with tamper protection or with a motion detector covering the enclosure. More in the FAQ
2. Button bar
Four buttons are always visible below the menu bar:

- Read [F4] – reads the settings of the connected device. If Automatic reading is switched on, you don't need it over USB.
- Write [F5] – sends the changed settings to the device. Changes only take effect after a successful write.
- Open [F8] – loads settings previously saved to a file (you browse to select the file).
- Save [F9] – saves the settings open in the program to a file.
What is happening at the moment, and whether it succeeded, is shown in the bottom left corner of the window, in the Status field of the status bar: for example reading done, or a message that writing is complete. With a remote connection you can also see here how far reading or writing has progressed, as a percentage.
Settings template: save and open
Saved settings are useful in two ways:
- backup – you can use it later to restore the device's settings;
- template – if you need to configure several similar devices, configure and save the first one, then open the file for the others and write it with Write [F5].
After a firmware change, an old backup may cause errors. It is rare, but a firmware update can bring new features to the device that the previously saved settings don't match. If a device configured from a saved file behaves unusually, restore the default settings and enter the settings manually, one by one.
3. USB configuration

With the upper box (USB configuration) you can work even without a device: you can prepare a device's settings or look at saved settings. Select the device type from the Configuration program drop-down list and press OK: you get the same settings pages as if the device were connected. Without a device, some functions and settings are not available.
4. Remote access

With the lower box (Remote access) you reach the device over the internet, without going on site. Requirements:
- the device must have a working internet connection (Ethernet, Wi-Fi or mobile network, depending on the device);
- the Protegus service must be enabled in the device – remote access does not work without it;
- the connection must be reliable: with a weak, slow or unstable internet connection, the connection often cannot be established.
The box contains two fields:
- Unique ID – the IMEI number for mobile (SIM card) devices, the MAC address for the others. You can find it on the device's box, and also in Protegus 2 among the system information.
- System Name – optional, but it is worth entering a name that clearly identifies the system. After a successful connection, the program remembers the ID together with the name on this computer, and later you can select it by name from the drop-down list next to the field: you don't have to remember the ID.
Next to the fields there are two buttons.
Configure
With the Configure button, the program reads the device's settings over the internet. The device keeps working in the meantime; it does not switch to programming mode. The settings appear the same way as over USB; you send the changes back with the Write [F5] button. Changes only take effect when the write completes successfully: during writing the status bar shows the percentage, and at the end it shows that writing is complete.
Don't wait too long before writing. The program opens a connection to the device and keeps it alive, but if you don't write back for a long time after reading, the connection may drop and the write will report an error. In that case, reconnect, read the device again and repeat the changes.
Control
With the Control button you can view the device's status and control some of its functions remotely. The tabs differ from device to device; for an alarm control panel (for example FLEXi SP3) they are:
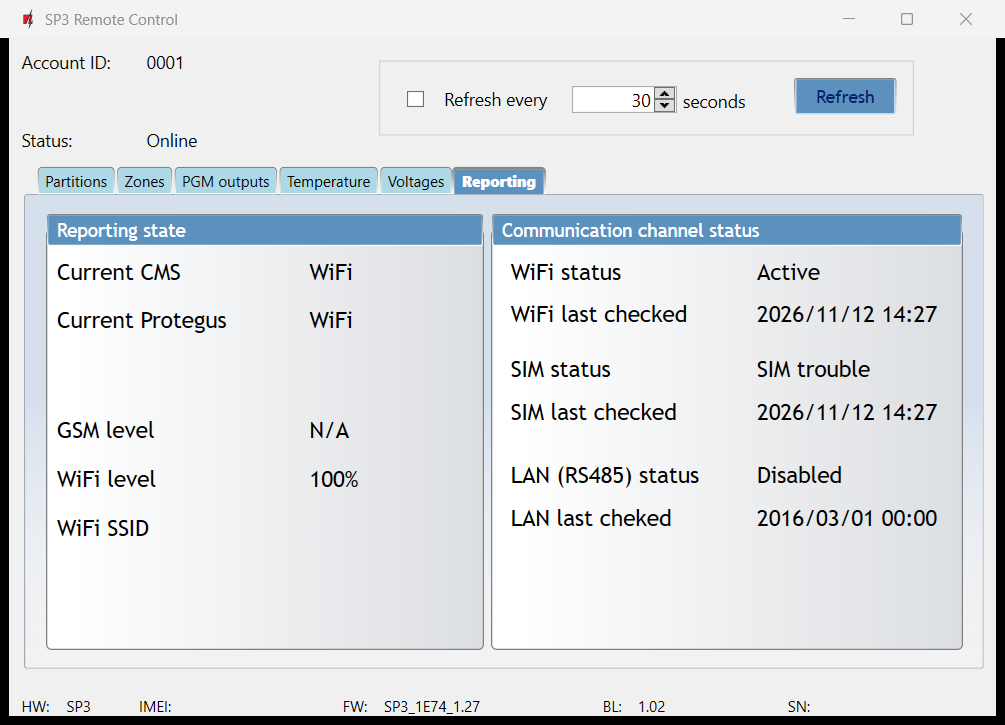
- Partitions – partition names and status; arming, disarming, stay and sleep arming;
- Zones – zone names and status, bypass per zone;
- PGM outputs – output status and switching, with a pulse length setting;
- Temperature – the measured value, if a temperature sensor is connected;
- Voltages – depending on the device: AUX voltage, mains (AC) power status, battery voltage and charging current, siren voltage and status;
- Reporting – the status of the communication channels (Wi-Fi, SIM, LAN) with the time of the last check, the current reporting path, mobile and Wi-Fi signal strength.
At the top of the window you can update the data with the Refresh button or set up automatic refreshing. Control is covered in detail in a separate article of the series.
Passwords for remote access
- Control asks for the configured Protegus connection code; if the device still has the factory default, it asks for nothing.
- Configure likewise asks for the administrator or installer code if it is no longer the factory default.
Write down the codes you set!
A forgotten code cannot be retrieved, and it cannot be cleared by restoring the default settings either, because restoring them also requires a code. In that case, only the manufacturer or the distributor can reset it, and the device has to be sent to them. The exception is devices with a hardware RESET button (for example GT, GT+, GET, FireCom): holding the button down for 10 seconds restores the default settings without a password.
5. Status bar

At the bottom of the window, from left to right:
- Status – the last operation and its result, for example reading done.
- Device – the device type and hardware variant; this is the first part of the serial number on the box label (for example
SP3_1E74). - SN – the device's serial number.
- BL – the bootloader version.
- FW – the firmware version.
- HW – the hardware version (not filled in by every device).
- State – the connection type: USB or Remote.
- Role – the access level you are logged in with: Administrator or installer.