

G16T communicator – installer and user manual
Installer and user manual for the Trikdis G16T communicator: wiring to the alarm control panel, SIM and setup in TrikdisConfig, reporting to the monitoring station, the Protegus 2 app, testing and troubleshooting.
- 56 min read

1. Overview
The G16T is the Trikdis universal cellular communicator: it connects to the telephone line output (TIP/RING) of the alarm control panel and behaves like a telephone exchange. The control panel "dials", sends the Contact ID message with DTMF tones, and the G16T picks up the line, decodes the message and forwards it over a mobile data connection to the monitoring station receiver and to the Protegus cloud, into the user's app. This means it works with a control panel of any make that has a Contact ID dialer – the panel does not have to be replaced, only its dialer has to be set up. G16T communicators are certified to the highest security grade, EN 50131 Grade 4.
1.1 What it does and how it works
- Reports to the monitoring station. It sends the events over IP to a Trikdis software or hardware receiver (TRK protocol) – these work with any monitoring software – or to any universal receiver (SIA DC-09 2007/2012, SUR-GARD TL150). Towards a SUR-GARD receiver it converts the Contact ID codes received from the panel into SIA codes; the conversion table is in the appendix of the English Trikdis documentation. By default it checks the connection every 30 seconds (or at the interval you set), and switches to the backup channel on failure.
- Notifies the user. The Protegus 2 app shows what happened in push notifications, with a distinct sound, and in the event list; from the app the user can arm and disarm, and switch the devices connected to it (lighting, gate, ventilation, heating, irrigation etc.). The app works with every alarm control panel the communicator is connected to, regardless of the panel's manufacturer.
- Works with the monitoring station and the user together or separately: it can be used with Protegus 2 only (without a monitoring station), with a monitoring station only, or with both. If both are set up, it sends the event to the monitoring station first, then to the user.
- SMS backup. It also notifies the monitoring station by SMS if the data connection does not work in the operator's network; it can send to two receivers in parallel, each with its own backup channel.
- It has its own inputs and outputs. Three dual-function I/O terminals can be used as inputs (detector, tamper) or as controllable outputs (keyswitch zone, relay). On the RS485 bus of the 4G version, an iO-8 expander adds 8 more I/Os (other wired or wireless iO-series expanders add further inputs and outputs, an iO or iO-WL expander adds remote temperature monitoring), and with a W485 or E485 module it can also communicate over WiFi or wired internet – in that case the mobile network is the backup path.
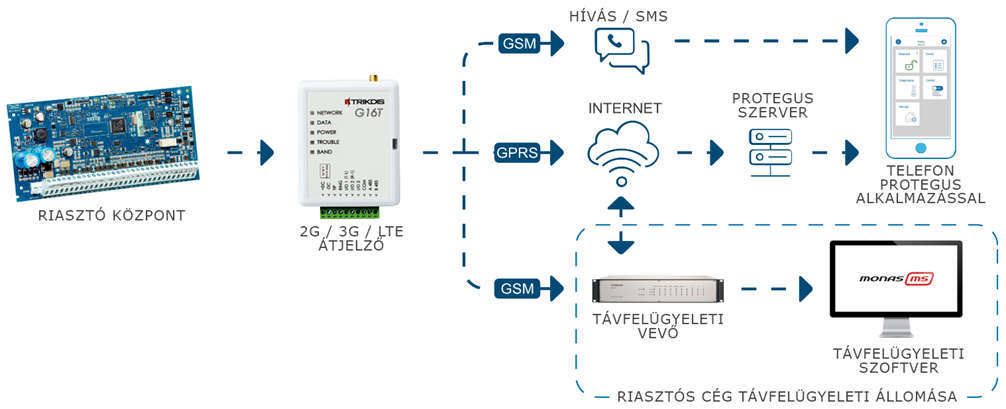
The figure below shows how the system is built: the telephone line output of the alarm control panel connects to the G16T, the G16T reaches the internet over the mobile network, and from there the monitoring station receiver and the Protegus cloud, while the user sees the system in the Protegus 2 app.
1.2 Versions
This manual was written for hardware version 4 of the G16T, but it can also be used for hardware version 3: wiring, setup and operation of the two versions are largely the same. The differences are summarized in the table below; where the text gives a value for version 4, take this into account for version 3.
| Hardware version 3 (v3) | Hardware version 4 (v4) | |
|---|---|---|
| Types | G16T_321x (2G), G16T_331x (3G), G16T_341x (4G), G16T_3M10 (LTE Cat-M1 + 2G) – all with 1 SIM card | G16T_G410 (2G), G16T_E120 (4G, with 2G fallback) |
| Inputs/outputs | 2 inputs of selectable type (T-1/IN1, R-1/IN2 – can also be used to supervise the telephone line) + 1 open-collector output (OUT, max. 0.15 A) | 3 dual-function I/O terminals, each usable as an input or as an open-collector output (max. 0.15 A) |
| Current consumption | 60–100 mA; up to 250 mA while sending | 60–100 mA; up to 500 mA while sending |
| Modem frequencies | 2G: 850 / 900 / 1800 / 1900 MHz; 3G: 800 / 850 / 900 / 1900 / 2100 MHz; 4G: region-dependent | 2G: 850 / 900 / 1800 / 1900 MHz; 4G: region-dependent |
| Size | 92 × 62 × 26 mm | 92 × 65 × 26 mm |
| RS485 bus (iO-8, W485, E485) | yes | only on the 4G version (G16T_E120) |
Hardware version 4 is made with two modems:
| Type | Modem | Frequencies | RS485 (iO-8, W485, E485) |
|---|---|---|---|
| G16T_G410 | 2G (GSM/GPRS) | 850 / 900 / 1800 / 1900 MHz | no |
| G16T_E120 | 4G (LTE), with 2G fallback | region-dependent | yes |
You can find the hardware version in the TrikdisConfig status bar (HW) and on the label on the back of the device.
1.3 Main features
Connection to the alarm control panel
- Can be connected to the panel's telephone line output with 2 wires (TIP, RING) or 4 wires. With 4-wire connection the link between the panel and the communicator is supervised: the communicator reports a broken wire.
- The panel sends the events in Contact ID format with DTMF dialing; the G16T forwards the full event information (code, partition, zone or user).
Communication with the monitoring station
- IP connection with Trikdis receivers (IPcom software receiver, RL14, RM14) and universal receivers (SIA DC-09, TL150).
- Primary, backup and parallel channel; backup SMS notification to the Trikdis SMS receiver (RL14, RM14, GM14).
- AES-128 message encryption; event buffer of 60 messages.
User functions
- Protegus 2 mobile and web app: push notification with a distinct sound, event list, arming and disarming, switching outputs.
- Remote temperature monitoring (with an iO or iO-WL expander).
- Control and basic setup with SMS commands as well.
- Notification by SMS and by phone call as well, to up to 4 phone numbers.
- Multi-level user rights in the app (administrator, installer, user).
Installation and setup
- The settings can be saved to a file and loaded into other communicators.
- Two access levels: administrator (the monitoring station's) and installer.
- Can be configured and updated remotely with the TrikdisConfig software.
1.4 Parts of the communicator
The G16T's printed circuit board sits in a white plastic case; the front cover can be removed and the terminal block can be pulled off. The figure below shows the 4G version; the 2G version has no BAND LED and no A 485 / B 485 terminals.

- 1 SMA connector of the GSM antenna
- 2 LED indicators (NETWORK, DATA, POWER, TROUBLE, BAND)
- 3 Slot that helps remove the front cover
- 4 Detachable terminal block
- 5 USB Mini-B socket for programming
- 6 Nano SIM card holder
The terminal block can be pulled off: this way the device can be powered down or restarted in one move, it is easier to handle during wiring, and for USB programming the device can be taken to the computer.
1.5 Terminals
| Terminal | Function |
|---|---|
| +DC | Power, +10–18 V DC |
| −DC | Power, negative |
| TIP | TIP terminal of the alarm control panel |
| RING | RING terminal of the alarm control panel |
| I/O 1 (T-1) | Input/output 1, or the T-1 point of the telephone line supervision |
| I/O 2 (R-1) | Input/output 2, or the R-1 point of the telephone line supervision |
| I/O 3 | Input/output 3 |
| COM | Common (negative) point for the inputs and outputs |
| A 485 | Wire A of the RS485 bus (4G version only) |
| B 485 | Wire B of the RS485 bus (4G version only) |
The terminal labels are also printed on the front cover, so you do not have to remove the cover while wiring.
1.6 LED indications
The LEDs on the front cover are the most important tools for commissioning and troubleshooting. Read them together: POWER shows the power supply, NETWORK the network, TROUBLE the fault, and BAND (4G only) the network type.
NETWORK – network connection
| Indication | Meaning |
|---|---|
| off | No connection to the mobile network |
| blinking yellow | Connecting to the mobile network |
| steady green | Connected to the mobile network |
| steady green, blinking yellow | Connected; the number of yellow blinks is the signal level: on 2G 5 blinks, on 3G/4G 3 blinks is a good signal |
DATA – data traffic
| Indication | Meaning |
|---|---|
| off | No messages waiting to be sent |
| steady green | There are messages waiting to be sent in the buffer |
| blinking green | Data is being sent or received (during programming) |
Quick check
The DATA LED is the simplest internet check. The DATA LED is lit when there is a message waiting to be sent in the device's memory. A green NETWORK LED only tells you that the network connection has been established – for a mobile network device, that it has registered on the operator's network; for an Ethernet device, that the connection up to the router is alive – but not that the device can also reach the internet. If the NETWORK LED is green but the DATA LED stays lit continuously even after an event or test report, the internet connection is not working: the message cannot be sent. On a mobile network the most common culprit is the APN or the data service of the SIM card; on Ethernet, the router, the firewall or the DNS. When the DATA LED goes out, the message has been sent and the data connection is fine.
POWER – power supply
| Indication | Meaning |
|---|---|
| off | No power, or the power is disconnected |
| steady green | Powered on, the supply voltage is correct |
| steady yellow | Supply voltage is not adequate (11.5 V or lower) |
| steady green, blinking yellow | Ready for programming (USB cable plugged in) |
| steady yellow (during programming) | No connection to the computer |
TROUBLE – fault
| Indication | Meaning |
|---|---|
| off | No fault |
| 1 red blink | No SIM card |
| 2 red blinks | SIM PIN error (wrong PIN code) |
| 3 red blinks | Programming error (no APN) |
| 4 red blinks | Cannot register to the mobile network (registration error) |
| 5 red blinks | Cannot connect to the data network (GPRS/UMTS/LTE) |
| 6 red blinks | No connection to the monitoring station receiver |
| 7 red blinks | Connection to the alarm control panel lost |
| blinking red (during programming) | Memory error |
| steady red (during programming) | Corrupted firmware |
BAND – network type (4G version only)
| Green blinks | Network |
|---|---|
| 1 | none |
| 2 | GSM |
| 3 | GPRS |
| 4 | EDGE |
| 5 | 3G (HSDPA, HSUPA, HSPA+, WCDMA) |
| 6 | 4G (LTE TDD, LTE FDD) |
1.7 Technical specifications
| Parameter | Value |
|---|---|
| Connection to the alarm control panel | wired telephone line (TIP/RING), Contact ID, DTMF |
| Inputs/outputs | 3 dual-function I/Os: as inputs NC, NO, NC/EOL, NO/EOL, NC/DEOL, NO/DEOL (2.2 kΩ end-of-line resistor); as outputs open collector (OC), max. 0.15 A / 30 V DC |
| Expansion | on the RS485 bus (4G version only): iO-8 expander (+8 I/O) and other iO-series expanders; W485 WiFi, E485 Ethernet module |
| 2G modem | 850 / 900 / 1800 / 1900 MHz |
| 4G modem | region-dependent LTE bands |
| Supply voltage | 10–18 V DC |
| Current consumption | 60–100 mA nominal; up to 500 mA while sending |
| Transmission protocols | TRK, DC-09_2007, DC-09_2012, TL150 |
| Event buffer | 60 messages |
| Encryption | AES-128 |
| Programming | TrikdisConfig (Windows) over a USB Mini-B cable or remotely; SMS commands |
| Operating environment | −10 … +50 °C, max. 80 % relative humidity (at +20 °C) |
| Size | 92 × 65 × 26 mm |
| Weight | 80 g |
2. Quick start with TrikdisConfig
All settings of the G16T are made with the Windows program called TrikdisConfig – over a USB cable or remotely. This chapter describes the shortest path: you set up the device on the desk, before wiring, and on site you only have to wire it in. The settings are explained in detail in chapter 6.
2.1 Preparation
What you will need
USB Mini-B cable · cable with at least 4 cores to the control panel · 2.5 mm flat screwdriver · a mobile antenna with suitable gain (if coverage is weak on site) · an active nano SIM card with mobile data service · the installer manual of the alarm control panel.
Order the required accessories separately from your distributor.
1. Download and install the TrikdisConfig software. On the Trikdis website (www.trikdis.com), type "TrikdisConfig" in the search field.
All Trikdis devices can be programmed using a common software. The software is called TrikdisConfig and can be downloaded from the manufacturer's website.
After downloading, install the program. If a new version is available each time you start TrikdisConfig, download and install the recommended update!
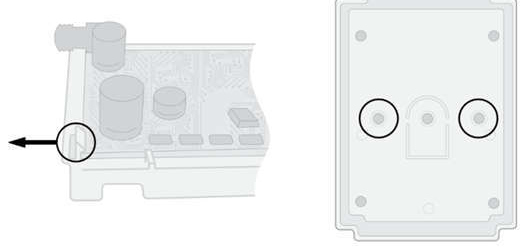
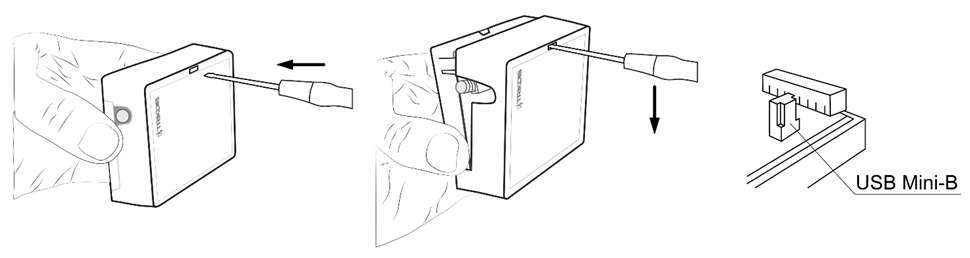
2. Open the front cover of the G16T. Insert a flat screwdriver into the side slot and gently snap the cover off. The figure below shows where the latch is and the screw holes of the back plate.
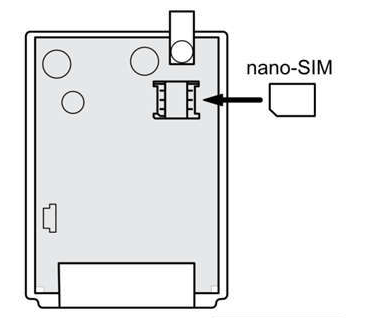
3. Insert the nano SIM card into the holder, in the direction shown in the figure. The card must be active and have mobile data service, and if possible, disable its PIN request in a phone (so you do not have to enter a PIN in the device).
4. Connect the G16T to the computer with a USB Mini-B cable. USB provides enough power for programming, no separate power supply is needed.
While the USB cable is plugged into the Trikdis device (and the other end into the computer), the device switches to programming mode.
- Normal operation stops,
- It draws power from the USB cable,
- After unplugging, it restarts (if powered).
5. Start TrikdisConfig. The program recognizes the device and opens the programming window. Click the Read [F4] button: the program reads the device's current settings. If it asks for a password, enter the 6-digit administrator code (factory default 123456) or installer code (factory default 654321).
2.2 Connection to the Protegus 2 app
If the user wants to see and control the system from the Protegus 2 app, set the following on the User reporting page, on the PROTEGUS Cloud tab.

- 1 Enable connection – tick it: enables the connection to the Protegus cloud.
- 2 Protegus Cloud access code – change the factory password
123456. This is what has to be entered in the app when the system is created; it cannot be changed after the system has been created.
Then enter the card details on the SIM card page.
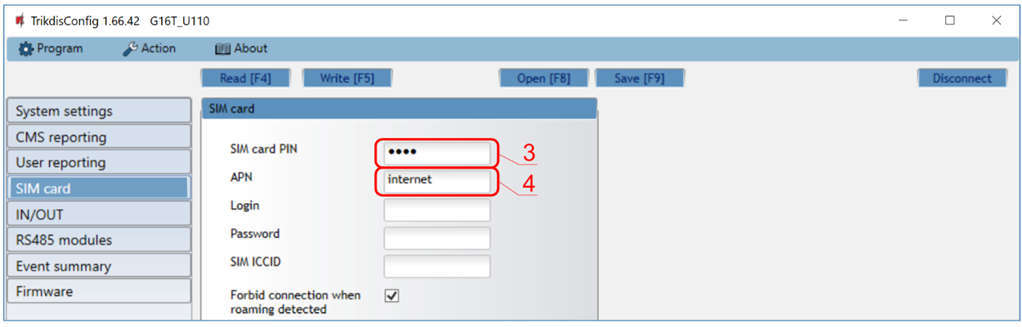
- 3 SIM card PIN – the card's PIN code (if the PIN request is disabled, the factory value can stay).
- 4 APN – the operator's data access point (see below).
The APN (Access Point Name) is the mobile operator's data access point; without it the device cannot connect to the internet. You get the exact value from the SIM card's operator. We keep the known APNs of Hungarian and other European operators in a separate article: APN setup – list of European mobile operators. If you have no other information from the operator, try the internet APN: it is generic and works in many operators' networks.
For IoT / M2M (machine-to-machine) data cards, the operator usually gives a different APN than for consumer cards – with the consumer APN the device does not connect. You can find this value in the APN article too, or ask the operator; if the operator also gives a user name and password, enter those as well.
If the device does not report to a monitoring station, the setup is done: press the Write [F5] button, wait for the confirmation, and unplug the USB cable.
Do not forget to enable and set up the telephone line dialer of the alarm control panel, otherwise the panel does not send events. Setting up the panel is described in chapter 4.
2.3 Connection to the monitoring station
If the device also reports to a monitoring station receiver, first enter the object ID on the System settings page.

- 1 Object ID – the object ID received from the monitoring station (4 hexadecimal characters, 0–9, A–F).
FFFEandFFFFcannot be used.
Then, on the CMS reporting page, in the Primary channel section, set the receiver's details.
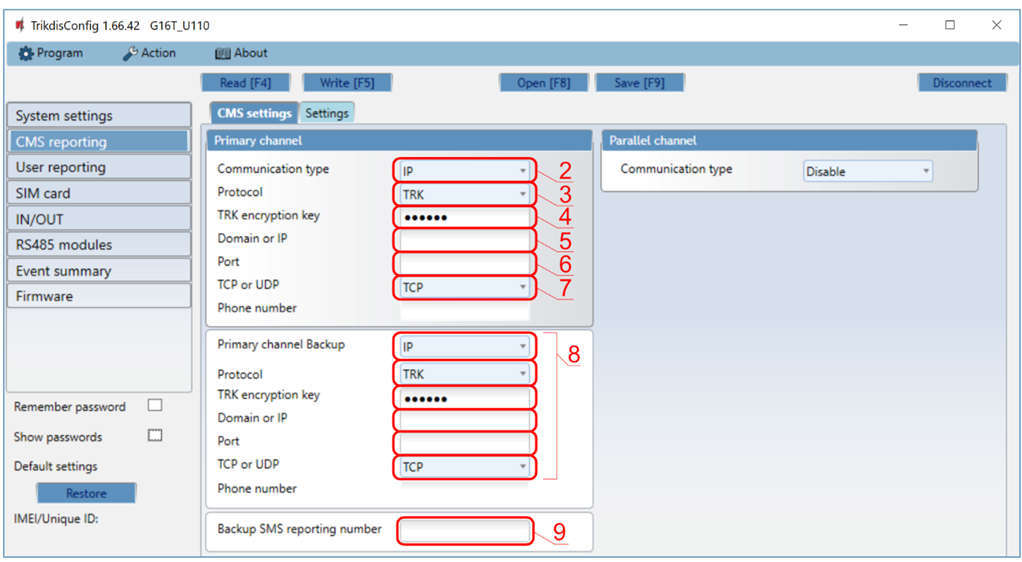
- 2 Communication type – select the IP connection (SMS is not recommended as the primary channel).
- 3 Protocol – TRK for a Trikdis receiver, DC-09_2007 or DC-09_2012 for a universal receiver, TL150 for a SUR-GARD receiver.
- 4 TRK encryption key – the 6-digit encryption key set in the receiver.
- 5 Domain or IP – the receiver's domain name or IP address.
- 6 Port – the receiver's port number.
- 7 TCP or UDP – the transmission protocol; it follows the receiver's setting.
- 8 Primary channel Backup – backup channel in case the primary fails; fill it in the same way, recommended.
- 9 Backup SMS reporting number – if there is a Trikdis SMS receiver, enter its phone number here: the device sends an SMS here right after the first start, and afterwards it reports by SMS when none of the IP channels works.
Finally, enter the card details on the SIM card page, if you have not done so in section 2.2.

- 10 SIM card PIN – the card's PIN code.
- 11 APN – the operator's access point (see section 2.2).
SMS reporting to the monitoring station only works with a Trikdis receiver (RL14 IP/SMS receiver, RM14 multi-channel receiver or GM14 SMS receiver); in that case only the encryption key and the phone number are needed. With the DC-09 protocol, also enter the DC-09 object, line and receiver number on the Settings tab.
At the end of the setup, press the Write [F5] button, wait for the confirmation, and unplug the USB cable. The device is now ready to be wired in. Here too, the telephone line dialer of the alarm control panel has to be enabled and set up, otherwise the panel does not send events (chapter 4).
3. Installation and wiring
Warining!
It is forbidden to perform wiring on a device under voltage. Before starting the work, disconnect power (including backup batteries).3.1 Installation steps
- Remove the front cover (see section 2.1) and pull off the terminal block.
- Insert the nano SIM card, if you have not done so during commissioning.
- Take the printed circuit board out of the back plate: open the latch in the corner (see the figure in section 2.1).
- Fix the back plate with screws in the chosen place.
- Put the printed circuit board back into the back plate, and plug the terminal block back in.
- Screw on the GSM antenna.
- Put the front cover back.
The SIM card must be active, and for IP-based use, mobile data must work on it. If you do not want TrikdisConfig to ask for a PIN code, disable the PIN request on the card in a phone.
3.2 Placement and antenna
- Put the communicator in a dry, indoor place, preferably close to the alarm control panel's enclosure, so that the wiring is short.
- In a metal enclosure the mobile signal is heavily attenuated. If the communicator goes into the panel's metal enclosure, lead the antenna outside the enclosure, or use an antenna with a longer cable.
- Before final mounting, check the signal level: the number of yellow blinks of the NETWORK LED should be at least 5 on 2G and at least 3 on 4G (see section 1.6). If it is lower, find a better place, or switch to a more sensitive antenna that can be placed further away.
- Keep the antenna and the communicator away from the panel's transformer and from mains wiring.

The mobile network communicator comes with a basic ANT01S GSM antenna as standard. If weak signal is expected at the installation location, or if the device is shaded by a metal box or a thick wall, it is recommended to use a higher-gain antenna, such as the ME301M magnetic or ANT04 stick-on antenna with 2.5m cable.
3.3 Connecting to the alarm control panel
The G16T has to be connected to the panel's telephone line output (TIP/RING), and it gets its power from the panel's 12 V auxiliary power output (AUX). It can be connected in two ways:
- With 2 wires (TIP, RING): simple, but the communicator does not detect if the wire is broken.
- With 4 wires (TIP, RING, plus T-1 and R-1 on the I/O 1 and I/O 2 terminals): the connection is supervised, the communicator reports a broken wire. For this, enable the Line supervision option on the System settings page of TrikdisConfig. In this case I/O 1 and I/O 2 cannot be used for anything else.

The G16T can draw up to 500 mA while sending. Check that the panel's AUX output can handle this together with the other devices connected to it. As the power comes from the panel, during a power cut the panel's battery also powers the communicator.
3.4 Wiring a keyswitch zone
If you want to arm and disarm the panel remotely, from the Protegus 2 app, set one of the communicator's I/O terminals as an output and connect it to a keyswitch zone of the panel. When activated, the output pulls the zone to COM (negative); connect the zone's end-of-line resistor according to the panel's zone type. As the G16T has three I/O terminals, up to three partitions can be controlled with separate outputs. Set the terminal used for the keyswitch to the OUT function on the IN/OUT page of TrikdisConfig (section 6.6). Hardware version 3 has one programmable output (OUT), which can control one partition; there, the Output OUT1 mode field on the System settings page must be Remote control (this is the factory setting).

The keyswitch zone can be pulse or latching (two-state) – the same mode has to be set in the Protegus 2 app (section 5.2). The details and pitfalls of keyswitch arming are covered in a separate article: Remote arming with a keyswitch from the Protegus 2 app.
3.5 Wiring inputs
As inputs, the communicator's I/O terminals can also take additional detectors (e.g. tamper switch, panic button, temperature switch), independently of the alarm control panel. The input has to be connected between the chosen I/O and the COM terminal.
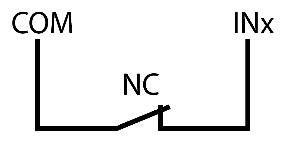
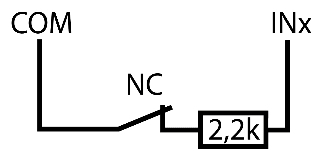
The inputs accept the following circuit types: NC, NO, NC/EOL, NO/EOL, NC/DEOL, NO/DEOL. The end-of-line resistor is 2.2 kΩ. With a single end-of-line resistor (EOL), both a short circuit and an open circuit count as an alarm; with double end-of-line resistors (DEOL), the two resistors allow the alarm and the tamper (short or open circuit) to be recognised separately. The factory setting is NO (normally open); you set the input type on the IN/OUT page of TrikdisConfig, according to the wiring.
| Type | Normal state | Alarm | Tamper |
|---|---|---|---|
| NC | closed | open | – |
| NO | open | closed | – |
| NC/EOL | 2.2 kΩ | open or short circuit | – |
| NO/EOL | 2.2 kΩ | short or open circuit | – |
| NC/DEOL | 2.2 kΩ | 3.3–5.5 kΩ (2 × 2.2 kΩ) | open or short circuit |
| NO/DEOL | 3.3–5.5 kΩ (2 × 2.2 kΩ) | 2.2 kΩ | open or short circuit |
When the input is triggered, the communicator sends its own event to the monitoring station and to Protegus 2; you can set the event's Contact ID code, partition and zone number on the IN/OUT page.
Wiring the input circuits: NC, NO, EOL and DEOL types with a 2.2 kΩ end-of-line resistor, with a tamper loop for the DEOL types.

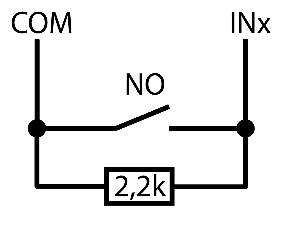
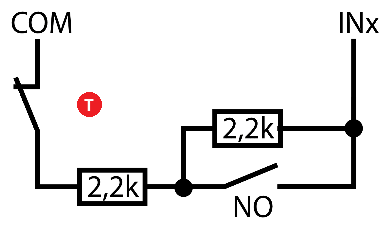
- T tamper contact ("Tamper"), signals that the detector's cover has been opened
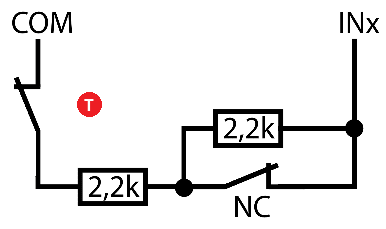
- T tamper contact ("Tamper"), signals that the detector's cover has been opened
3.6 Wiring an output with a relay
As outputs, the I/O terminals are open-collector (OC) outputs: in the active state they pull the connected load to negative, with up to 0.15 A, up to 30 V DC. Switch a larger load or a mains-voltage device through a relay: one end of the relay coil goes to +DC, the other to the I/O terminal.
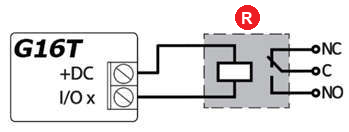
- R relay ("Relay")
You can switch the outputs from the Protegus 2 app or with an SMS command (chapter 5).
3.7 Wiring the iO-8 expander
If you need more inputs or outputs, up to four iO-8 expanders can be connected to the RS485 bus of the 4G version; each adds 8 more dual-function I/Os. The other wired or wireless expanders of the Trikdis iO series can also be connected to the same bus, for example if you want to connect a temperature sensor: the iO expander has 1 input, 1 relay output and a 1-Wire bus for temperature sensors (its setup is in section 6.7). Connect the A 485 and B 485 terminals to the module's A and B terminals, and take the module's power from the panel's 12 V. The module has to be added on the RS485 modules page of TrikdisConfig (section 6.7).
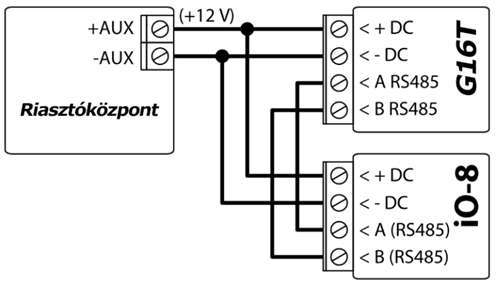
The G16T with the 2G modem (G16T_G410) has no RS485 bus, so no iO-8, W485 or E485 module can be connected to it.
3.8 Wiring the W485 and E485 modules
Ethernet or Wi-Fi expansion – W485 and E485. The communicator can be extended with a W485 Wi-Fi or E485 Ethernet module: the events then travel over wired internet or Wi-Fi to the monitoring station and to the Protegus 2 app.
- Connection: on the RS485 bus, from the same power supply as the communicator (the module's power input is 9–28 V DC); no separate power supply is needed.
- The internet is the primary channel: as long as it is up, everything goes through it. If it drops, the communicator automatically switches to the mobile network, and as soon as the internet returns, it switches back to IP.
- Not just for reporting: the Protegus 2 app (notifications, remote control) also works over this channel.
- E485 – wired Ethernet (RJ45). W485 – Wi-Fi 2.4 GHz (WPA / WPA2), where no UTP cable has been run.
- If required, it can also be used without a SIM card. Configuration: with the TrikdisConfig software, over USB.
 Trikdis E485 Ethernet module (RS485)
 Trikdis W485 Wifi module (RS485)
As long as the WiFi or Ethernet connection is up, the G16T communicates through it (the monitoring station and Protegus messages go over the WiFi router or the wired internet, and the mobile data connection is not used meanwhile); if it drops, it switches to mobile data, and returns to the module when the connection is restored. For the module to work, there must be a SIM card in the G16T.


The “up to … m” distances are theoretical maximums achievable under ideal conditions. In practice, the quality and routing of the cable, sources of interference and, for radio links, walls and terrain give a considerably shorter range. Plan with a margin, and on long runs check the connection during commissioning.
You make the modules' network settings on the RS485 modules page of TrikdisConfig (section 6.7).
3.9 Power-up and first check
Starting the TRIKDIS communicator
- For SIM card communicators, insert the SIM card into the device before starting.
- For devices with Ethernet, you can connect the Ethernet cable before or after starting up.
- For startup, unplug the USB cable and connect the pulled jumper.
You can proceed to the next chapter when the device starts correctly and does not indicate any errors.
- The Power LED is green
- The Trouble LED does not flash red
- The Network LED is green (if it flashes yellow, it is okay)
- If the Data LED does not turn off, it means that the device cannot send some event. This indicates an internet / data connection error.
After wiring, the communicator starts when the alarm control panel is powered on. This is what you should see on the front cover:
- POWER steady green – the power supply is correct;
- NETWORK steady green and blinking yellow – connected to the network; the number of blinks is the signal level (5 on 2G, 3 on 4G is good); if you count fewer, the signal is weak: find another place for the communicator, or use a more sensitive antenna (section 3.2);
- TROUBLE off.
If TROUBLE is blinking, the number of blinks tells you the cause (section 1.6); any other LED indication also signals some fault, find its cause using the tables in section 1.6. If none of the LEDs is lit, check the power supply and the wiring.
4. Programming the alarm control panel
For the alarm panel to send events on its telephone-line output, the panel's dialler must be enabled and configured. You will find the exact program addresses in the panel's installation manual; the essence of the setting is the same for every manufacturer:
- Enable the telephone-line (PSTN) communicator in the panel.
- Enter
1234as the telephone number of the monitoring receiver – whether the communicator is connected to the panel's RING/TIP terminals or to the telephone line. With another number it can happen that the panel dials but the communicator still does not receive the events: with a DSC PowerSeries NEO panel, too, reporting only started after the number was changed to1234. - Dialling mode: DTMF (tone), not pulse.
- Protocol: Contact ID.
- Account number: the 4-digit account number received from the monitoring station (for Protegus 2 it does not have to be unique, but for the monitoring station it does).
If you want to arm and disarm the panel remotely with the communicator's output, the zone wired to the output must be set as a keyswitch zone in the panel.
The keyswitch zone can be pulsed or latched (two-state). By default, the communicator's output gives a 3-second pulse; you can change the pulse length or switch to latched mode in the settings of the Protegus 2 app.
4.1 Programming the Honeywell Vista dialer
Enter programming mode on the keypad and set the following program addresses:
| Program address | Setting |
|---|---|
*41 |
the telephone number of the monitoring receiver: 1234 |
*43 |
the panel's account number |
*47 |
Tone dial = 1, and the number of dialling attempts |
*48 |
7 (default) |
*49 |
5 (Split/Dual message) |
*50 |
delay before sending a burglary alarm – default 2,0 (30 s); for immediate sending 0,0 |
For a Honeywell Vista 48 panel, also set the following program addresses:
| Program address | Value | Program address | Value | Program address | Value |
|---|---|---|---|---|---|
*41 |
1234 (receiver telephone number) | *60 |
1 | *69 |
1 |
*42 |
1234 | *61 |
1 | *70 |
1 |
*43 |
1234 (account number) | *62 |
1 | *71 |
1 |
*44 |
1234 | *63 |
1 | *72 |
1 |
*45 |
1111 | *64 |
1 | *73 |
1 |
*47 |
1 | *65 |
1 | *74 |
1 |
*48 |
7 | *66 |
1 | *75 |
1 |
*50 |
1 | *67 |
1 | *76 |
1 |
*59 |
0 | *68 |
1 |
At the end of programming, exit programming mode with the *99 command.
4.2 Control panels of other manufacturers
In the installer manual of every control panel, look for the same five settings: enabling the telephone line communicator, the receiver's phone number, the dialing mode (DTMF), the communication format (Contact ID) and the object ID (account number). If the panel waits for a dial tone before dialing, the G16T provides it; if the call still does not start, disable dial tone detection in the panel ("dial without dial tone" or a similar option).
If the panel reports a fault at the end of the call even though the event has arrived, check the Wait acknowledgment from CMS setting on the System settings page of TrikdisConfig: when enabled, the communicator only closes the call after the monitoring station receiver's acknowledgment (kiss-off). In a system without a monitoring station, used with Protegus 2 only, leave it disabled (this is the factory state), because there is no receiver to acknowledge.
5. Remote control with the Protegus 2 app
With the Protegus 2 mobile and web app, the user sees the system status remotely, gets notified of events, can arm and disarm, and can switch the communicator's outputs.
5.1 Adding the device
Before adding the device, check:
- The SIM card is active and mobile data works on it; its PIN code is entered in the device, or the PIN request is disabled.
- On the User reporting → PROTEGUS Cloud tab of TrikdisConfig, Enable connection is ticked and the Protegus Cloud access code is set (it cannot be changed after the system has been created).
- The POWER LED is steady green, the NETWORK LED is steady green and blinking yellow.
Creating the system in the Protegus 2 application
- Download the Protegus 2 application to your phone or open it in a browser
- Register an account if you haven't already.
- Log into your account.
- On the main page, click the "+" button to create a system
- Enter the unique identifier of the TRIKDIS device (you can also scan the barcode or QR code with your phone's camera), which you can find
- On the sticker of the device
- On the device's cardboard box
- In the bottom left corner of TrikdisConfig (selectable and copyable format)
- Enter the system name and select a time zone
- Your system is created, you can still name the partitions and zones at the next step, but you can do this later anytime.
- In the last step, your system's home screen will appear. Wait until the yellow stripe disappears and your system is ready.


The device's unique identifier (IMEI) can be read on the box and on the back of the device, and the TrikdisConfig status bar also shows it.
5.2 Arming and disarming with an output
If you want to arm and disarm the alarm panel with the communicator's output, through the panel's keyswitch zone, specify in the Protegus 2 app for the partition which output controls it.
The panel zone to which the communicator's output is connected must be programmed as a keyswitch zone in the panel, and the panel must report the arming and disarming events – Protegus 2 shows the partition state based on these.
You can make the setting when creating the system, while adding the partitions, or later in the system settings, when editing the partition. When creating the system, the Protegus 2 wizard guides you through: click Continue, enter the partition name (Area name) and enable control of the PGM output from the Protegus 2 app – this is done with the following steps:
- Select (or add) the partition you want to control. The partition number must match the one the panel sends in its events (partition 1 as 1, partition 2 as 2).
- Switch on Control with Protegus2 (control with PGM), and in the Assigned Output field select the communicator output (PGM1, PGM2 …). One output can control only one partition.
- Select the operating mode: Pulse or Level (latched) – the same one you set for the keyswitch zone in the panel. Typically we use pulse; the pulse length can also be set (default 3 s).
- Save the setting (Save). With several partitions, repeat this for each one with its own output: in the wizard you add a further partition with the Click to add an area button and set its PGM output in the same way. When you have set up all partitions, move on in the wizard with the Skip button.
Protegus 2 can only show the state of the partitions correctly if the panel sends the arming and disarming events with the correct partition number. The details and pitfalls of keyswitch arming are covered in a separate article: Remote arming with a keyswitch from the Protegus 2 app.
5.3 Arming and disarming from the app
- Open the system in the Protegus 2 app. On the home screen every partition has its own card and padlock: a closed, red padlock means an armed partition, an open, green padlock a disarmed one.
- Tap the partition's padlock and select the required action: arm or disarm.
- If the app asks for it, enter the PIN code.
The padlock takes on the actual state in response to the event received from the alarm panel; the app also confirms in the event list and in a notification whether the panel has carried out the action.
5.4 Control with SMS messages
The communicator can also be controlled and programmed with SMS messages. The structure of the message:
PASSWORD space COMMAND space DATA – for example 123456 OUTPUT1 ON
With the administrator password all commands can be used; with the installer password, the INFO, RESET and OUTPUTx commands.
| Command | Data | What it does | Example |
|---|---|---|---|
INFO |
– | Requests information about the device: type, IMEI, serial number, firmware version | 123456 INFO |
RESET |
– | Restarts the device | 123456 RESET |
OUTPUTx |
ON |
Switches output x on | 123456 OUTPUT1 ON |
OUTPUTx |
OFF |
Switches output x off | 123456 OUTPUT1 OFF |
OUTPUTx |
PULSE=tttt |
Gives a pulse on output x; tttt = the pulse length in seconds, with four digits |
123456 OUTPUT2 PULSE=0002 |
CONNECT |
PROTEGUS=ON / PROTEGUS=OFF |
Enables or disables the Protegus connection | 123456 CONNECT PROTEGUS=ON |
CONNECT |
IP=address:port |
IP address and port of the primary channel | 123456 CONNECT IP=192.120.120.255:8000 |
CONNECT |
ENC=key |
The TRK encryption key | 123456 CONNECT ENC=123456 |
CONNECT |
APN=name |
The APN of the SIM card | 123456 CONNECT APN=internet |
CONNECT |
USER=name |
APN user name (if the operator requires it) | 123456 CONNECT USER=user |
CONNECT |
PASS=password |
APN password (if the operator requires it) | 123456 CONNECT PASS=password |
You can restrict which telephone numbers the device accepts commands from: TrikdisConfig → User reporting → Control by SMS page. If no number is entered, it executes a command with the correct password from any number.
On the G16T, the CONNECT command has one more parameter: CP=1 disables, CP=2 enables the communicator's telephone line interface. Example: 123456 CONNECT CP=2.
6. TrikdisConfig – the settings in detail
On the left of the TrikdisConfig window you see the list of pages (System settings, CMS reporting, User reporting, SIM card, IN/OUT, RS485 modules, Event summary, Firmware), at the top the button bar (Read [F4], Write [F5], Open [F8], Save [F9]), and at the bottom the status bar. This chapter goes through the G16T's settings page by page.
6.1 The status bar
After connecting the device and reading it (Read [F4]), the most important device data are shown at the bottom of the window:
| Label | Meaning |
|---|---|
| IMEI / Unique ID, on an Ethernet device MAC / Unique ID | The device's unique identifier: the IMEI on a device with a SIM card, the MAC address on an Ethernet device. The same is printed on the box and on the back of the device. |
| Status | The current operating status. |
| Device | The device type (model designation). Check that the type of your own device is shown here. |
| SN | Serial number. |
| BL | The bootloader version. |
| FW | The firmware version. |
| HW | The hardware version. |
| State | The connection mode: USB or remote. |
| Administrator / Installer | The access level of the person programming (after the password has been entered). |
After making the settings, you write them to the device with the Write [F5] button; with the Open [F8] and Save [F9] buttons you can save the complete set of settings to a file and load it into another device. Save [F9] saves the settings to a settings file, and Open [F8] opens the saved file; you can later load the saved settings into other devices as well, so you can quickly set up several devices with identical settings.

After Read [F4], the program reads and shows the values set in the device; make the necessary settings as described for each page below.
6.2 System settings
The page consists of two groups: in the General group you set the basic operation of the device, in the Access group the access levels.
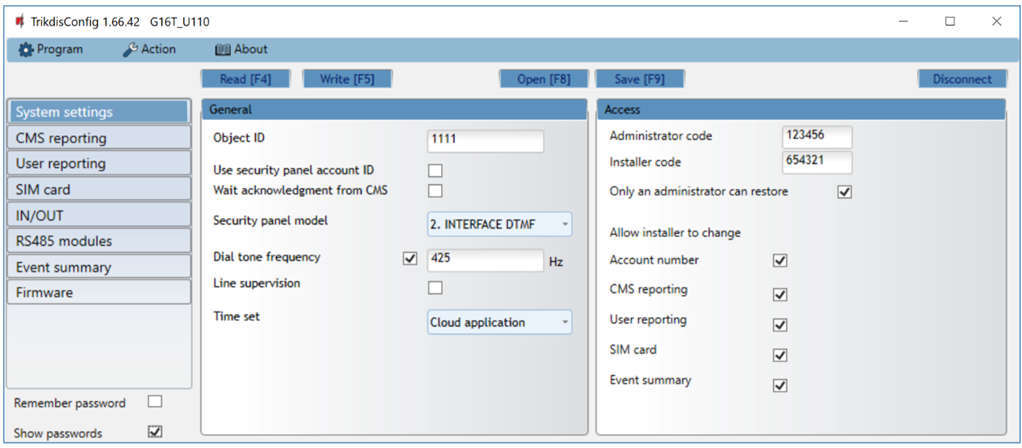
- Object ID – the object ID received from the monitoring station (4 hexadecimal characters: 0–9, A–F;
FFFEandFFFFcannot be used). Mandatory if the device also reports to a monitoring station. - Use security panel account ID – when ticked, the communicator does not use its own Object ID but the ID sent by the panel in the Contact ID message. Useful if several partitions report with separate IDs.
- Wait acknowledgment from CMS – when ticked, after every event the communicator waits for the receiver's acknowledgment, and only then sends the closing (kiss-off) signal to the panel. If there is no acknowledgment, the panel sends the event again. In a system without a monitoring station, used with Protegus 2 only, leave it disabled (factory state).
- Security panel model – the type of the telephone line interface (this enables or disables the communicator's DTMF telephone line interface); default 2. INTERFACE DTMF.
- Dial tone frequency – the frequency of the dial tone the G16T gives towards the panel (default 425 Hz, which is the dial tone used in Hungary and in most European countries).
- Line supervision – supervision of the wire between the panel and the communicator; requires 4-wire connection (section 3.3).
- On hardware version 4, the type of the inputs and the role of the outputs are set on the IN/OUT page (section 6.6). On hardware version 3 these two fields are here: Input IN1-IN2 type – the input type from the list (NO, NC, NO/EOL, NC/EOL, NO/DEOL, NC/DEOL); Output OUT1 mode – the output's operating mode from the list.
- Time set – the source of the device's clock (default Cloud application, the Protegus cloud).
In the Access group you manage the access levels and passwords.
There are two access levels for the device settings: administrator and installer.
- Administrator code – access to all settings (default password:
123456; the password is 6 characters: digits or Latin letters). - Installer code – access that can be restricted (default password:
654321). - Only an administrator can restore – when ticked, only the administrator can start restoring the factory settings.
- Allow installer to change – here you can select which groups of settings the installer may change: Account number, CMS reporting, User reporting, SIM card (on a mobile network device) or Ethernet settings (on an Ethernet device), Event summary.
Do not leave the default passwords in the device!
During commissioning, change at least the administrator password and note it down in a safe place. If the password is forgotten, the only remedy is restoring the factory settings, which deletes all settings.
6.3 CMS reporting
The communicator sends the events to the monitoring station over mobile data (IP) or by SMS. The events can go over several channels: the primary and the parallel channel work at the same time (to two receivers at once), and each has a backup channel, which takes over if the given channel is lost. The communication is encrypted and password-protected; to receive the events and forward them to the monitoring software, you need a Trikdis receiver (IPcom software receiver – Windows or Linux –, RL14, RM14; for receiving SMS the RL14 IP/SMS receiver, the RM14 multi-channel receiver or the GM14 SMS receiver) or a universal receiver that supports the DC-09 / TL150 protocol. SMS is particularly useful as a backup channel, because it works without mobile internet; we do not recommend it as the primary channel.
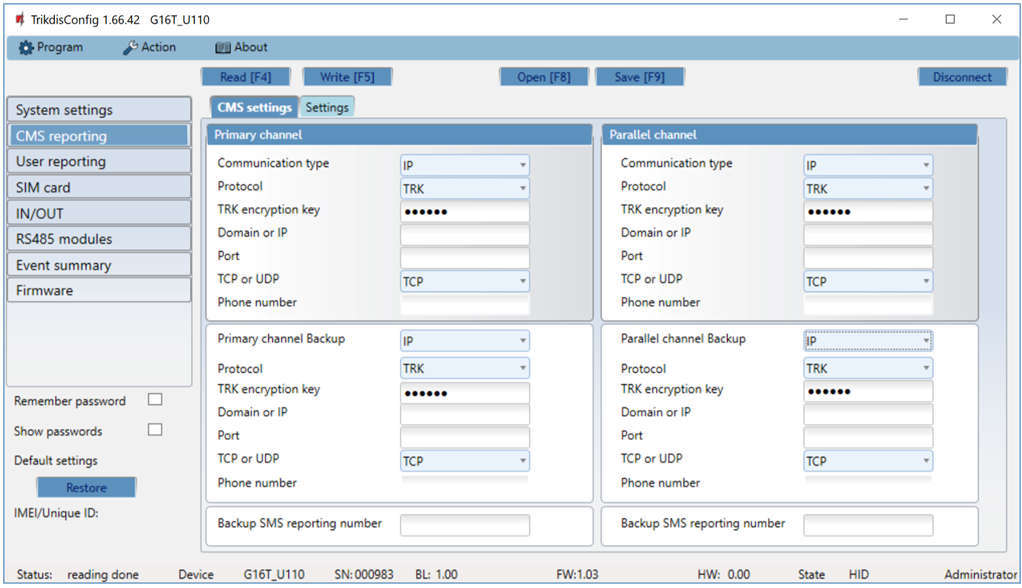
Primary channel
- Communication type – IP or SMS.
- Protocol – TRK (Trikdis receivers), DC-09_2007 or DC-09_2012 (universal receivers), TL150 (SUR-GARD).
- TRK encryption key – 6-digit encryption key; it must be the same in the communicator and in the receiver.
- Domain or IP, Port – the receiver's address and port.
- TCP or UDP – the transmission protocol.
- Phone number – only for SMS communication: the phone number of the Trikdis SMS receiver with country code (e.g.
36xxxxxxxxxfor a Hungarian number).
Primary channel Backup – backup channel. Takes over the communication if the primary channel does not work; its settings are the same as above.
Parallel channel. Sends to a second receiver at the same time as the primary one (for example to the local and the central monitoring station). It has its own backup channel.
Backup SMS reporting number. Takes effect if sending fails on the primary, the parallel and the backup channel as well; it is useful because it works without an IP connection. It is only active if the primary and the backup channel are in IP mode. The device sends an SMS to the monitoring station's SMS receiver after the first start, and also if the TCP/IP or UDP/IP connection is lost on both the primary channel and its backup. Enter the Trikdis SMS receiver's phone number with country code (e.g. 36xxxxxxxxx for a Hungarian number).
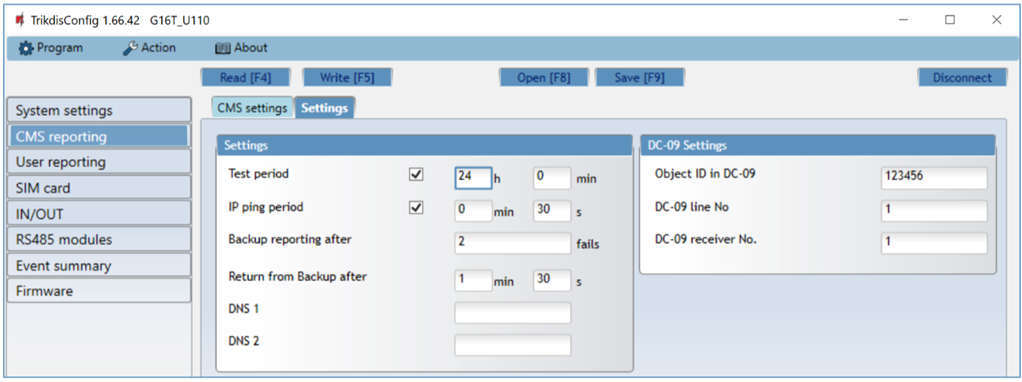
On the Settings tab you set the timings and the DC-09 data.
- Test period – the interval of the periodic test report (default 24 hours). The test report is sent as a Contact ID message to the monitoring station and to Protegus 2.
- IP ping period – the interval of the keep-alive signal (PING) on the IP channel (default 30 s). You enable it with the tick box and enter the time in the minutes (min) and seconds (s) fields; it is required for connection supervision. The receiver does not forward PINGs to the monitoring software so as not to overload it; the software only receives a message if the receiver gets no PING for three times the set period. For example, if the PING period is 3 minutes, the loss of connection is reported after the 9th minute.
- Backup reporting after – after this many failed sending attempts the device switches to the backup channel (default 2).
- Return from Backup after – after this time it returns to the primary channel (default 1 min 30 s).
The PING keeps the live connection between the device and the receiver, and remote access, control and programming also depend on it. That is why we do not recommend a PING period longer than 5 minutes.
DC-09 Settings (on the right side of the tab) – only needs to be filled in if you send with the DC-09_2007 or DC-09_2012 protocol on any channel; the group appears when DC-09_2007 or DC-09_2012 is selected in the Protocol field of any channel:
- Object ID in DC-09 – a 3–16 character hexadecimal identifier, provided by the monitoring station.
- DC-09 line No – the line number.
- DC-09 receiver No. – the receiver number.
At the bottom of the tab: DNS 1, DNS 2 – name servers (DNS, Domain Name System: returns the IP address belonging to a domain name); they are needed if you entered the receiver with a domain name and not with an IP address. The default is Google's public DNS.
6.4 User reporting
On the PROTEGUS Cloud tab you enable the Protegus service. With the Protegus service the user can remotely monitor and control the communicator and the system connected to it; details: www.protegus.app.
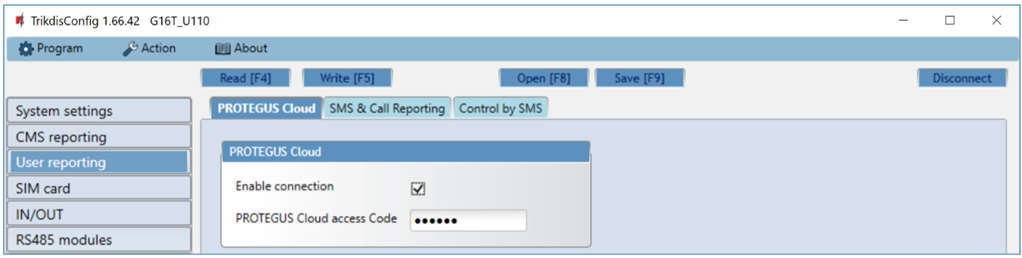
- Enable connection – enables the connection to the Protegus cloud and remote access from TrikdisConfig.
- Protegus Cloud access code – 6-digit code for the Protegus connection (factory default
123456). It can only be set before the system is created in Protegus 2, it cannot be changed afterwards.
On the SMS & Call Reporting tab, the user can also get notifications of events by SMS or by phone call.
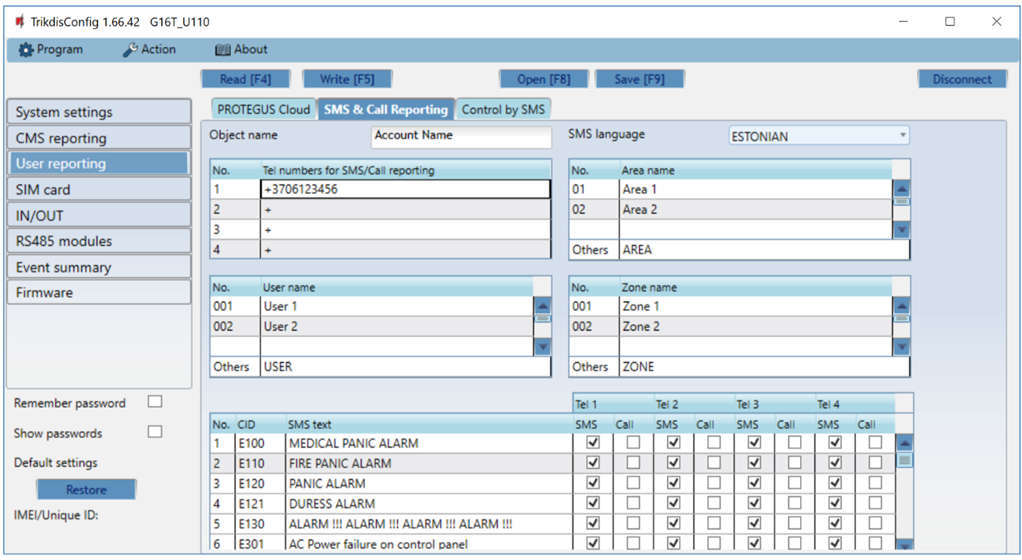
- Object name – the name of the system; it is included in every SMS.
- SMS language – the language of the SMS messages (for the language's accented characters).
- Tel numbers for SMS/Call reporting – up to 4 phone numbers with country code (e.g. for a Hungarian number
+36…,0036…or36…). - Area name, User name, Zone name – the names of the partitions, users and zones; the device uses these in the text of the SMS messages. In the corresponding table, enter the number of the partition, user or zone, and its name next to it.
- CID event table – for each event you can set which number gets an SMS or a call; the message text and the Contact ID code can also be changed, and new events can be added.
On the Control by SMS tab you set up the receiving of SMS commands (the commands are described in section 5.4).
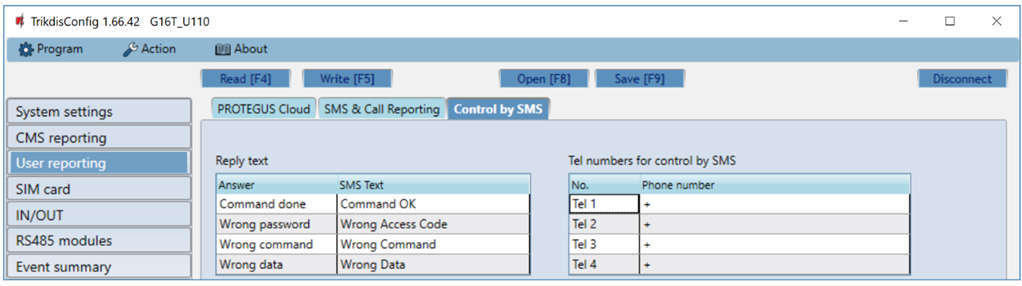
- Reply text – the text of the four reply messages to an SMS command: successful command (Command done), wrong password (Wrong password), wrong command (Wrong command), wrong data (Wrong data). The reply texts can be edited.
- Tel numbers for control by SMS – up to 4 numbers; the device only accepts commands from these numbers. If empty, it accepts a command with the correct password from any number. Security is then still provided by the fact that the administrator or installer password is mandatory in the command.
6.5 SIM card
Without the SIM card details, the device does not connect to the data network.
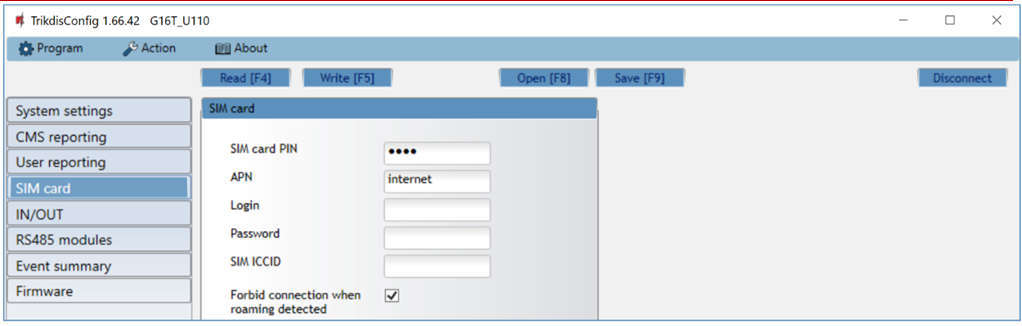
- SIM card PIN – the card's PIN code. You can disable the PIN request by putting the card into a mobile phone and disabling it there. If the PIN request is disabled, the field's factory value can stay.
- APN – the operator's access point; the known APNs of operators are listed in the APN article (for an IoT / M2M card, the operator gives a separate APN, see section 2.2). The APN is needed for the device's internet connection; if you have no other information, try the
internetAPN, which is generic and works in many operators' networks. - Login, Password – APN user name and password, if the operator requires them.
- Forbid connection when roaming detected – useful near a national border: prevents the device from connecting to the network of the neighbouring country.
Before use, make sure that the SIM card is active and that mobile data service is enabled on it for IP communication.
6.6 IN/OUT
Here you set the role of the communicator's three dual-function I/O terminals: Disabled (not used), IN (input) or OUT (output). For an input, the type must also be set (NC, NO, NO/EOL, NC/EOL, NO/DEOL, NC/DEOL). On hardware version 3 these settings are on the System settings page (section 6.2).

When the detector connected to an input is violated, the communicator sends its own event (INx_ALARM, Contact ID 130), and when the tamper loop is violated, a tamper event (INx_TAMPER, 144), to the monitoring station and to Protegus 2; the events of every terminal set as an input appear in the table. The columns of the table:
- Enable – enables sending the message.
- E/R – the event type: Event (alarm) or Restore.
- CID – the Contact ID code.
- Part. – the partition number in the message.
- Zone – the zone number in the message.
6.7 RS485 modules
With iO-series expanders you can add further inputs, outputs and a serial bus for temperature sensors to the communicator. The iO-8 expanders (and the other iO-series expanders) and W485 / E485 modules connected to the RS485 bus have to be added on the Modules list tab.
This page cannot be used on the G16T with the 2G modem (G16T_G410): the 2G version has no RS485 bus.

- Module Type – the type of the connected module from the list (iO-8 and other iO-series expanders, W485, E485).
- Serial No – the module's 6-digit serial number (on the module and on its box, SN).
After selecting the module and entering the serial number, press the Write [F5] button, unplug the USB cable, and wait one minute while the communicator registers the module. Then plug the cable back in, read the device (Read [F4]), and the module's own numbered tab appears on the RS485 modules page.
iO-8 expander – 8 dual-function I/Os; up to 4 modules can be connected to the communicator.
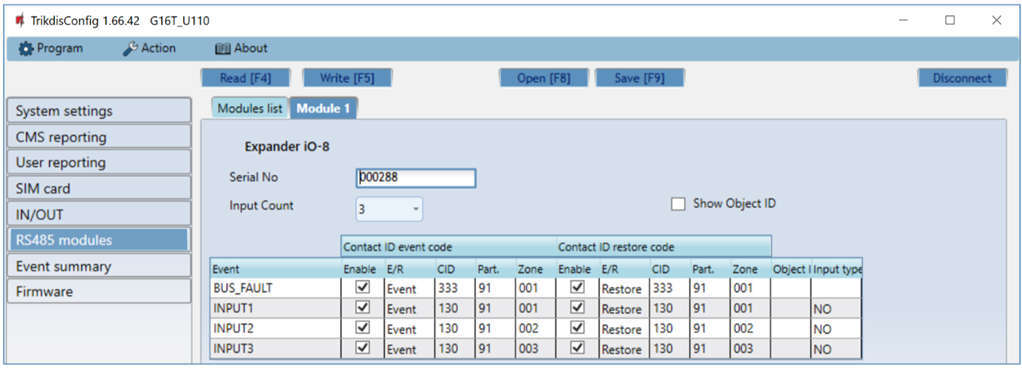
- Input Count – how many terminals should be inputs; the rest will be outputs. The input type (Input type: NO or NC) can be set in the table. You set the role of the outputs (arming / disarming or switching a device) in the Protegus 2 app.
- In the table you can assign Contact ID codes to the bus fault (BUS_FAULT, Contact ID 333) and to the violation and restore events of the inputs (INPUTx, 130) (Enable, E/R, CID, Part., Zone); when an input is violated, the communicator sends an event with the set code to the monitoring station receiver and to Protegus 2. By default module 1 reports with partition 91, module 4 with partition 94. By ticking Show Object ID, an object ID different from the communicator's can also be set for the inputs.
- If the user should also get an SMS or a call when the expander's inputs are violated, add the Contact ID event code assigned to the input to the table on the User reporting → SMS & Call Reporting tab as well.
iO expander – 1 input, 1 relay output (relay contacts) and a 1-Wire serial bus for temperature sensors. The relay output can also be controlled by logical (IF … THEN) conditions.
- Input IN1 type – the input type (NO or NC).
- Max °C (T1) – if the temperature is higher than this, the device sends an event; for this, the event must be enabled in the table.
- Min °C (T2) – if the temperature is lower than this, the device sends an event; for this, the event must be enabled in the table.
- In the table you can assign Contact ID event and restore codes to the input in the same way as for the iO-8 expander; when the input is violated, the communicator sends an event with the set code to the monitoring station receiver and to Protegus 2.
W485 WiFi module (W17u/W485 in the list) – the WiFi network details and the network settings.
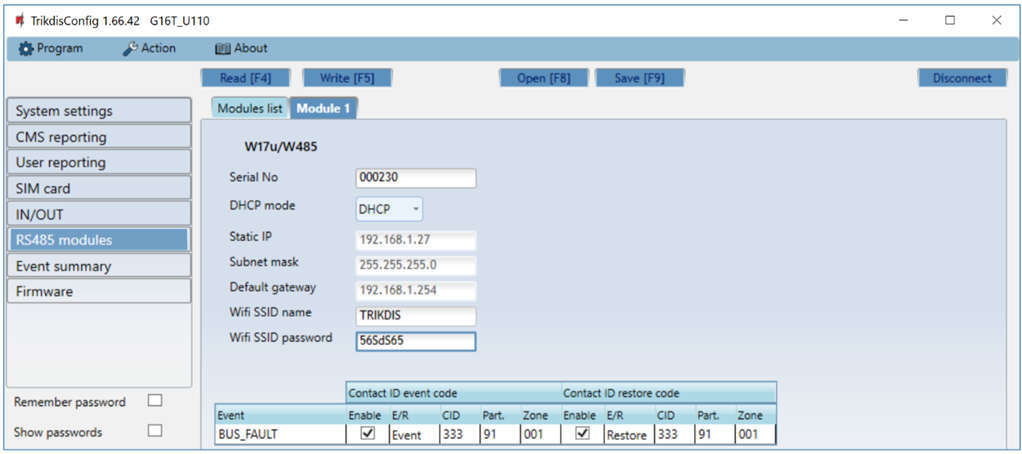
- DHCP mode – automatic or manual network settings.
- Static IP, Subnet mask, Default gateway – for manual settings.
- Wifi SSID name, Wifi SSID password – the name and password of the WiFi network.
- In the table you can assign Contact ID codes to the faults of the RS485 bus (loss and restore of the connection between the module and the G16T); the monitoring station and Protegus 2 both receive the event.
E485 Ethernet module – the same network settings without WiFi (DHCP mode, Static IP, Subnet mask, Default gateway), and in the same way you can assign Contact ID codes to the faults of the RS485 bus (loss and restore of the connection between the module and the G16T); the monitoring station and Protegus 2 both receive the event.

For the W485 and the E485 to work, the G16T's monitoring station and/or Protegus connection must be set up (sections 2.2 and 2.3), and by default there must also be a SIM card in the G16T (if needed, it can also work without a SIM: Trikdis added this later, on request).
6.8 Event summary
On this page you can enable or disable the device's own internal messages and change their Contact ID code, partition and zone number. A message disabled here is not sent by the device on any channel. By default the messages are sent with partition 99 and zone 999.
| Message | Contact ID | When it is generated |
|---|---|---|
| COMMUNICATION | 350 | Communication between the communicator and the alarm panel has been lost (disabled by default). A communicator connected to the bus or serial port detects this directly; a telephone-line communicator only with Line supervision enabled. |
| POWER | 302 | Inadequate (low) supply voltage; its restore is a separate message. |
| REMOTE_STARTED | 411 | Remote programming with TrikdisConfig has started. |
| REMOTE_FINISHED | 412 | Remote programming has finished. |
| START | 700 | The device has connected to the network (start-up). |
| TEST | 602 | Periodic test report. |
| PING | 760 | The PING keep-alive message. It is not in every device's list: it appears on the screen of the earlier hardware version, while the Event summary page of the newer versions has no such row. Its interval is set in the CMS reporting → Settings → IP ping period field. |
- Enable – enables sending the message to the monitoring station and to Protegus 2.
- E/R – the message type: Event or Restore – the row stands for the occurrence of the event or its restore.
- Part. – the partition (area) number the device sends with the internal event and its restore.
- Zone – the zone number the device sends with the internal event and its restore.
- The CID code, the partition and the zone can be changed for any event; where there is a restore (Restore), its code can be set separately.
The events of the device's own inputs (INx_ALARM, INx_TAMPER) are set on the IN/OUT page, and the events of the expansion modules (BUS_FAULT, INPUTx) on the RS485 modules page, on the module's tab. Enabling the test report and its interval are set in the CMS reporting → Settings → Test period field.

6.9 Restoring factory settings
To restore the factory settings, click the Restore button in the Default settings group at the bottom left of the TrikdisConfig window. Restoring deletes all settings – including the passwords – so it is worth saving the settings to a file first (Save [F9]).
With the installer password this is only possible if the administrator has not disabled it on the System settings → Access page.
7. Remote programming
TrikdisConfig reaches Trikdis devices not only over a USB cable but also remotely, via the Protegus cloud. This way you can change the settings of an already installed device without going to the site.
Remote access requires:
- The device must be switched on and have a network connection (the POWER and NETWORK LEDs are lit green; on a mobile network device the NETWORK LED also flashes yellow). On a mobile network device, the inserted SIM card must be active and its PIN code must be entered in the device, or the PIN request must be disabled; on an Ethernet device, the network (LAN) cable must be plugged in and the device must be able to reach the internet.
- On the User reporting → PROTEGUS Cloud page of TrikdisConfig, Enable connection must be ticked (set this over USB during the first commissioning).
- You need to know the device's unique identifier (IMEI or MAC – printed on the box and on the back of the device) and the administrator or installer password.
Steps:
- Start the TrikdisConfig software.
- In the Remote access section, enter the device's unique identifier (IMEI or MAC) in the Unique ID field.
- Optionally, give the system a name in the System name field – the software remembers it, and next time you can choose it from the drop-down list.
- Press the Configure button.
- In the window that opens, click the Read [F4] button and enter the password. With the Remember password tick box, the software remembers it for this session.
- Make the changes, then send them to the device with the Write [F5] button.
The software saves the named systems you have programmed remotely before; you can list them with the arrow next to the System name field. To delete one, select the identifier in the list, press the Delete key and confirm.

Enabling the Protegus cloud is described in section 6.4.
8. Testing the communicator
After programming and wiring, always check the whole chain: alarm panel → communicator → monitoring station and/or Protegus 2.
Before that, check that there is power (the POWER LED is lit green) and a network connection (the NETWORK LED is lit green).
- Trigger an event. Arm and then disarm the system on the keypad, or violate a zone while the system is armed so that an alarm is generated.
- Check that it arrives. See whether the event has appeared in the monitoring software and/or in the event list of the Protegus 2 app – with the correct partition and zone number.
- Inputs. Trigger the detector wired to the communicator's own input and check the corresponding event.
- Outputs. Switch the output from the Protegus 2 app and check that the connected device (relay, keyswitch zone) actually operates.
- Remote arming. If the panel can be controlled remotely, also arm and disarm it from the Protegus 2 app.
9. Firmware update
You can update the firmware yourself – to a newer version and, if necessary, to an older one as well. All device settings remain unchanged after the update.
- Start the TrikdisConfig software and connect the device with a USB cable, or open its programming remotely.
- If newer firmware is available, the software offers to download it – accept it.
- Select the Firmware page and click the Open firmware button. Select the firmware file.
- Press the Update [F12] button, wait for the update to finish, then click OK in the pop-up window. Do not unplug the cable or interrupt the connection in the meantime.
The firmware files are in the TrikdisConfig installation folder, inside the Firmwares subfolder, in the folder named after the device. If there is no such folder, either there is no update for it or the TrikdisConfig software itself needs to be updated. The latest files can also be downloaded as a registered user from the device's page on the manufacturer's website.
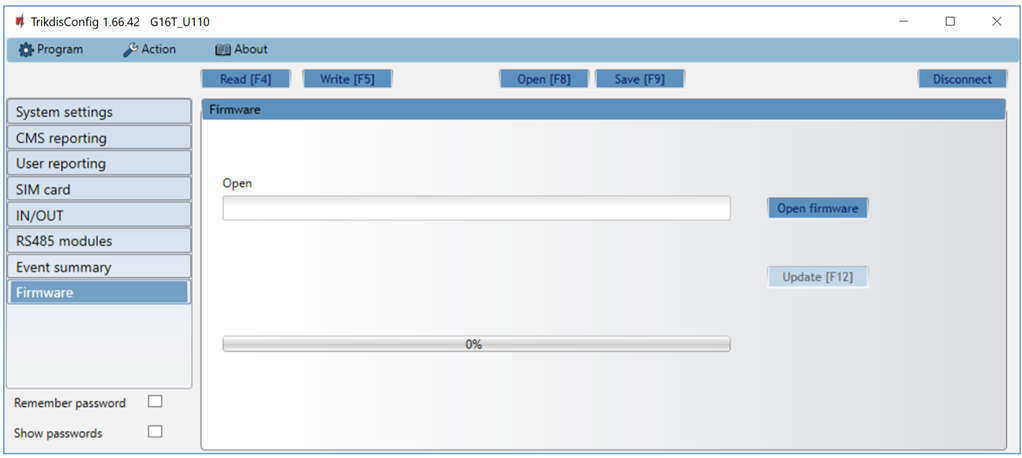
The update needs an internet connection. An antivirus program, a firewall or strict network settings can prevent the automatic firmware download; in that case download the file manually and open it on the Firmware tab.
10. Troubleshooting and frequently asked questions
The most common questions and faults, starting from the LED indications. Where the answer refers to the detailed chapter, you will find the exact place of the setting there.
The NETWORK LED is off – no network
- Look at the blinks of the TROUBLE LED: 1 = no SIM, 2 = wrong PIN, 3 = no APN, 4 = cannot connect to the GSM network, 5 = cannot connect to the data network.
- Check that the SIM card is active, has data service, and sits properly in the holder.
- If the PIN request is enabled on the card, enter the PIN on the SIM card page, or disable the PIN request in a phone.
- Check the antenna: it is screwed on, it is not in a metal enclosure, and the signal level is adequate (sections 1.6 and 3.2).
There is a network, but the monitoring station does not receive events
The DATA LED is the simplest internet check. The DATA LED is lit when there is a message waiting to be sent in the device's memory. A green NETWORK LED only tells you that the network connection has been established – for a mobile network device, that it has registered on the operator's network; for an Ethernet device, that the connection up to the router is alive – but not that the device can also reach the internet. If the NETWORK LED is green but the DATA LED stays lit continuously even after an event or test report, the internet connection is not working: the message cannot be sent. On a mobile network the most common culprit is the APN or the data service of the SIM card; on Ethernet, the router, the firewall or the DNS. When the DATA LED goes out, the message has been sent and the data connection is fine.
- 6 blinks of the TROUBLE LED mean there is no connection to the receiver: check the receiver's address, port, the TCP/UDP setting and the encryption key (CMS reporting).
- If the receiver is entered with a domain name, check the DNS setting (CMS reporting → Settings).
- Check that the SIM card's data plan does not block the required port (some M2M cards only allow specific addresses).
The panel does not send the events to the communicator
- The panel's dialer must be enabled, in DTMF mode, with Contact ID format and a phone number entered (chapter 4).
- Check the TIP/RING wiring; 7 blinks of the TROUBLE LED indicate a lost connection to the panel (with 4-wire, supervised connection).
- If the panel waits for a dial tone and does not start the call, disable dial tone detection in it.
- If the panel reports a "communication fault" even though the event has arrived, check the Wait acknowledgment from CMS setting (section 6.2).
Protegus 2 does not see the device
- Enable connection must be ticked on the User reporting → PROTEGUS Cloud tab.
- When creating the system, enter the Protegus Cloud access code set in the device; it cannot be changed in the device after the system has been created.
- Enter the IMEI exactly, from the box or the back of the device.
- The SIM card's data service and the APN must be in order (the NETWORK LED is green, and the DATA LED goes off after an event).
I cannot log in remotely with TrikdisConfig
- The device must be online (NETWORK LED green), and the Protegus connection must be enabled.
- CMS reporting → Settings → IP ping period must not be longer than 5 minutes: the PING keeps up the connection needed for remote access.
- Check the administrator or installer password.
I forgot the password
Only restoring the factory settings helps (section 6.9); this needs a USB connection, and all settings are erased. If the administrator has disabled the installer reset, the reset cannot be started without the administrator password either.
Why can't I see the RS485 modules page, or why doesn't the iO-8 work?
The G16T with the 2G modem (G16T_G410) has no RS485 bus; iO-8, W485 and E485 can only be connected to the 4G version (G16T_E120). By default, the W485 and E485 modules also need a SIM card in the G16T; if needed, they can also work without a SIM (a later development by Trikdis, made on request).
I have a 2G device – how long will it work?
2G networks are being shut down at a different pace by each operator; for long-term operation we recommend the 4G version, which also has a 2G fallback. The 4G version can also be expanded via the RS485 bus.
How much data does the device use?
The event messages and PINGs are very small; the traffic depends mainly on the PING period and on the frequency of test reports. For an average household system, the monthly traffic typically stays below 10 MB. The exact value depends on the settings and on the operator's billing unit, so with a data-limited card it is worth checking the traffic of the first month.
11. Safety instructions
Attention!
Electricity can be dangerous and may cause personal injury or DEATH, as well as other financial loss or damage if not used or installed properly.
Installation involves working with electrical equipment, and it should be executed in accordance with current regulations!
Warranty validation requires the device to be installed by a qualified person following the installation regulations for electrical equipment and adhering to the current regulations for the safe operation of electrical equipment.
- Security equipment may only be installed and maintained by a qualified installer.
- Read the manual before installation; ignoring the instructions can lead to malfunction or damage.
- Disconnect the equipment from the power supply before wiring, before every electrical connection and before servicing.
- Faults resulting from improper installation or use, as well as modifications and repairs not authorized by the manufacturer, void the warranty.
- Follow local waste disposal regulations: do not throw the faulty device or its parts in household waste.
See also
- Remote arming with a keyswitch from the Protegus 2 app – details and pitfalls of keyswitch arming.
- Hardware version 4 of the G16 and G16T GSM communicators is arriving – what has changed compared with the previous version.
- What is new in the G16T v3 communicator – the product announcement.
- Documentation in English: docs.trikdis.com – the manuals on docs.trikdis.com are in English.