

“FLEXi” SP3 alarm control panel – user manual
User manual for the Trikdis “FLEXi” SP3 alarm control panel: arming and disarming from the keypad, from the Protegus 2 app, with a key or a card, by SMS and by phone call; managing users, alarms and troubles.
- 44 min read

1. About your alarm system
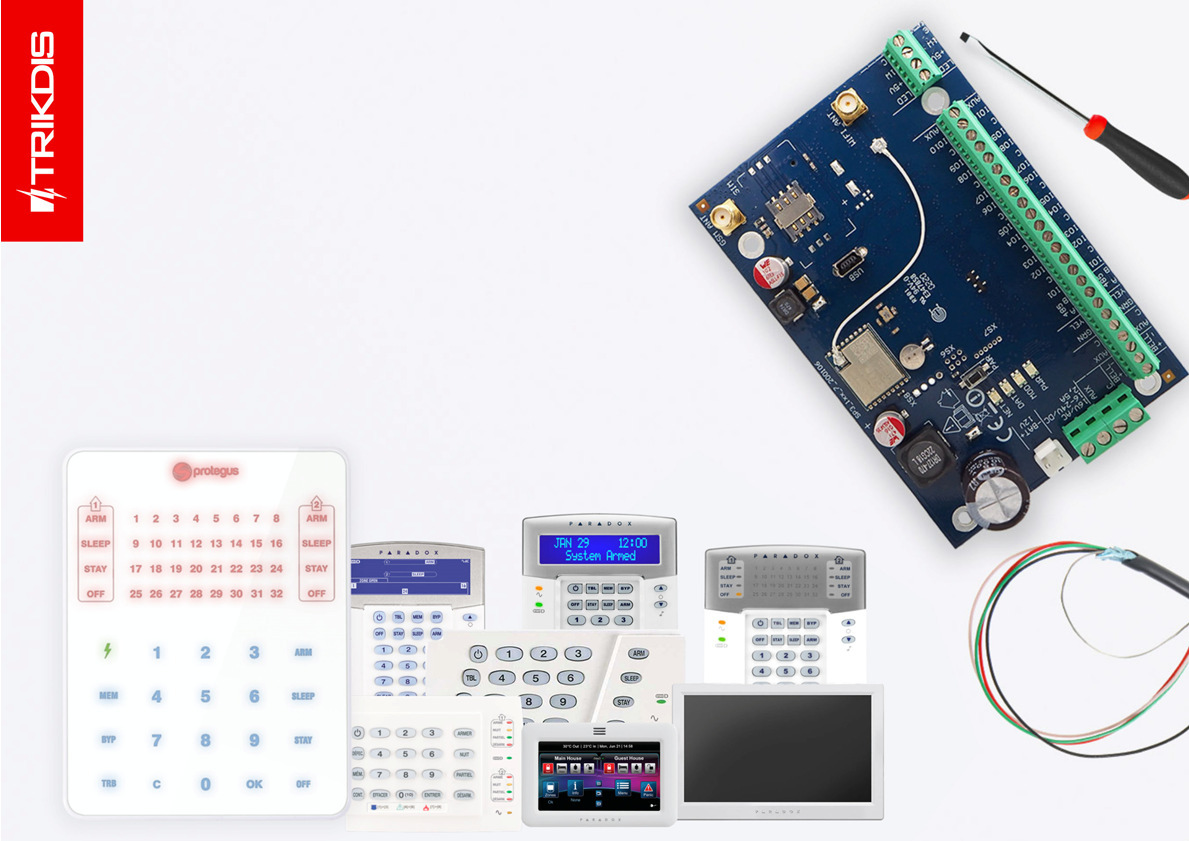
The “FLEXi” SP3 is the heart of your alarm system. It sits in a metal enclosure together with the power supply and the backup battery; the detectors, the siren and the keypads are connected to it. The communicator is built in as well: the panel reports directly to the monitoring station and to the Protegus 2 app over Wi-Fi, Ethernet or the mobile network. This manual is about everyday use; wiring and settings are the installer's job, and they are described in the installation and programming manual.
1.1 How it works
- When armed, the panel monitors every detector. If any of them signals, the siren sounds and – depending on the settings – the panel sends an alarm message to the monitoring station and to you.
- When disarmed, it reacts only to the zones monitored continuously, 24 hours a day: fire detectors, 24-hour and silent 24-hour zones, tamper.
- When partially armed (Stay and Sleep modes), the outer shell is protected and you can move freely inside. Which detector is monitored in which mode is set by the installer with the zone type.
- The entry delay gives you time to disarm the system after coming in through the entrance door; during the exit delay you can still leave the building after arming. Write the set times on the data sheet in chapter 12.
1.2 What you can control it with
You can control the system with several devices, and they can be used side by side:
- from a keypad – with a Trikdis, Paradox or Crow keypad (chapters 4, 5 and 6);
- from the Protegus 2 app on your phone or in a browser, from anywhere (chapter 3);
- with an iButton key or an RFID card on the reader installed at the entrance (chapter 8);
- by phone call and SMS – only on the versions with a mobile network modem (chapter 9);
- with a key switch, if the installer has set up a zone for it – the switch toggles the state of that zone and so arms or disarms the system;
- and the monitoring station can also arm or disarm it remotely, if you have agreed on this.
Paradox K32LCD+, K32+, K32LED, K32+ LED, K35, K10H, K10V, K636, TM50*, TM70*
Crow CR16, CR-LCD
LED keypads display the status of the first 2 areas only, but can control all 8 areas.
*This keypad can only arm/disarm the first 2 areas.
The LED keypads (Trikdis FLEXi LED, SK232LED W, SK-LED Button, Paradox LED models, Crow) show the state of the first two partitions, but they can control all eight partitions; if you have more partitions and want to see all of them, you need an LCD keypad. A system can have at most eight keypads of the same type.
1.3 How it notifies you
The panel sends events in the set order: first to the monitoring station, then to the users. The Protegus 2 app notifies you with a push message and a distinct sound; the modem versions also send SMS to up to eight phone numbers. Who gets a message about which event is set by the installer – if you are missing a notification, or you get too many, ask the installer.
1.4 Power supply
The panel runs on 230 V mains power, and during a power cut on the 12 V battery in the enclosure. While mains power is present, the battery is charged. How long the battery lasts depends on the system's consumption and on the age of the battery. A mains failure and a battery fault are shown by the keypad's trouble indicator (TRB) and by Protegus 2 as well (chapter 7).
Do not open the enclosure
There is mains voltage inside the panel's enclosure, and the tamper switch immediately reports the opening of the cover to the monitoring station. Opening the enclosure, replacing the battery and all wiring are the installer's job.
2. Operating states, codes and functions
2.1 The four operating states
The keypads and the app show the same four states. The system can be divided into partitions (on the keypad display: Area), and each partition has its own state.
| State | On the keypad | What it means |
|---|---|---|
| Disarmed | OFF (DISARM) | Only the 24-hour zones are protected: the alarm reacts to events of the fire, 24-hour and silent 24-hour zones. |
| Armed | ARM | All zones are protected, the alarm reacts to every event. |
| Stay | STAY | The outer shell is protected; you can move freely in the zones of the Interior STAY and Instant STAY types (interior rooms). If someone violates the delayed entry zone, the alarm starts only after the entry delay has expired. |
| Sleep | SLEEP | The same as Stay mode, but if the delayed entry zone is violated, the alarm starts immediately. |
Which mode when
ARM when everyone leaves the building. STAY when you are at home and go in and out during the day (the entrance door signals with a delay). SLEEP for the night, when nobody goes out: then opening the entrance door triggers the alarm immediately. Stay and Sleep modes can only be selected if the installer has set at least one zone to the Interior STAY or Instant STAY type.
2.2 Codes and permissions
Codes give users different levels of permission to operate the system. Codes consist of digits only (0–9); no other character – letter or punctuation mark – can be used, neither when choosing nor when entering a code. There are three kinds of code:
- User code – four digits; with it you arm, disarm and bypass zones. The panel stores up to 40 user codes. Every user should have their own code: this way the log and Protegus 2 show who did what, and a single code can be deleted at any time.
- Administrator code – six digits, 123456 by default. There is only one, it cannot be deleted, but it can be changed in the TrikdisConfig software (System Options → Access → Access codes). With it you add and delete user codes on the Trikdis SK232LED W, the FLEXi LCD and the Paradox keypads. It cannot be used to arm or disarm. It should consist of digits only: TrikdisConfig also accepts a code containing a letter, but letters cannot be typed on the keypad, so afterwards you will not be able to add or change user codes from the keypad.
- SMS password – six digits, 123456 by default; the beginning of the SMS commands (chapter 9).
Master code on the LED and Button keypads
On the FLEXi LED, the SK-LED Button and the SK-LCD Button keypads you program codes with the code of user 1, the master code (1234 by default), not with the administrator code. The exact steps are in section 4.9.
Change the default codes
On the first day, ask the installer to change the administrator code and the SMS password, and to give every user their own code. Do not write the codes down where the keypad is.
2.3 Security functions
| Function | What it does |
|---|---|
| Zone bypass (Bypass) | Excludes a zone from monitoring for the next arming. Useful if you need to arm but a detector is faulty and you cannot have it repaired right away. The bypass is cancelled after disarming. |
| Short siren signal (Bell Squawk) | The siren confirms arming with one short signal and disarming with two – so you know from outside that the command has arrived. |
| Door chime (Chime) | When the system is disarmed, the keypad's buzzer (or an output set for this) signals when someone opens the set zone, for example the entrance door. |
| Re-arming (Re-ARM) | Protects against accidental disarming: if you disarmed the system by phone call but nobody opened the entrance door during the entry delay, the panel returns to the previous armed mode. |
| Duress code | If you are forced to disarm (or arm) the alarm, disarm (or arm) it with the duress code: the system seemingly disarms (or arms) normally, but immediately sends a silent alarm (Duress) to the monitoring station. The duress code is enabled by the installer; it can be of two kinds: the last digit of your own code increased by one, or 0 in place of the first digit. |
2.4 Further functions
- Temperature monitoring – up to eight temperature sensors (DS18B20 or DS18S20) or one temperature and humidity sensor (AM2301) can be connected to the panel. A separate permitted range can be set for each; if the temperature leaves it, the panel sends an event to the users. Protegus 2 shows the current values; on the modem versions the
ASKTSMS command also requests them. - Remote switching of devices – other electronic devices (gate, lighting, heating, irrigation) connected to the panel's programmable open-collector outputs (PGM) can be switched from Protegus 2, with the keypad's shortcut keys, by SMS and by phone call (chapters 10 and 9).
3. Protegus 2 app
In Protegus 2 you see the system's state from anywhere, arm and disarm it, view the events, switch the outputs, and get a push message about every important event. The app works with every SP3 version that can reach the internet (Wi-Fi, Ethernet or mobile network). It is free for the user; on a phone you download it from the app stores, in a browser it opens at https://app.protegus.app.
3.1 Adding the system to your account
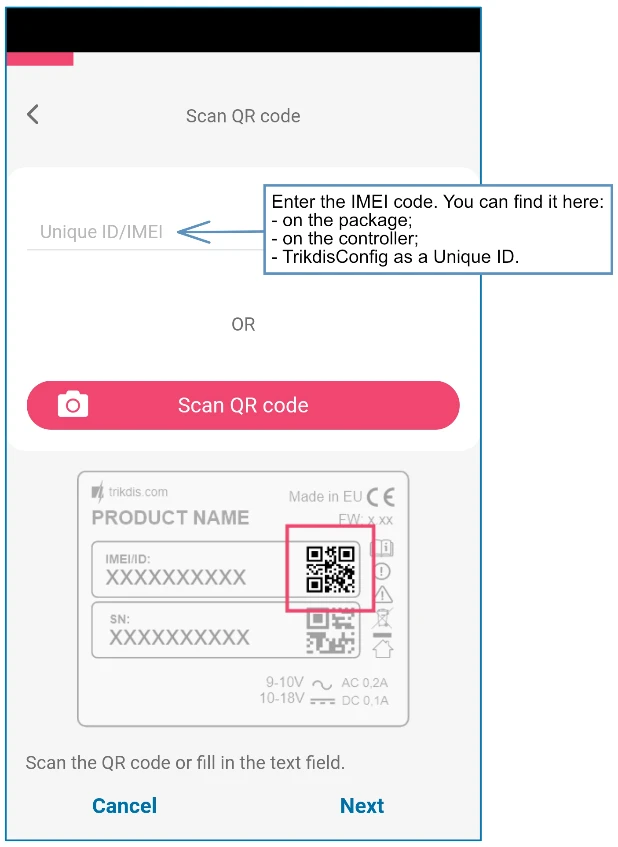
For this you need the panel's unique identifier, the IMEI/Unique ID number: you find it on the sticker on the packaging and on the board, and the installer also gives it to you. If the installer has already added the system from their own company account, it is simpler for them to invite you to your account: then you accept the link received in the invitation e-mail, and you do not have to type in the identifier.
Creating the system in the Protegus 2 application
- Download the Protegus 2 application to your phone or open it in a browser
- Register an account if you haven't already.
- Log into your account.
- On the main page, click the "+" button to create a system
- Enter the unique identifier of the TRIKDIS device (you can also scan the barcode or QR code with your phone's camera), which you can find
- On the sticker of the device
- On the device's cardboard box
- In the bottom left corner of TrikdisConfig (selectable and copyable format)
- Enter the system name and select a time zone
- Your system is created, you can still name the partitions and zones at the next step, but you can do this later anytime.
- In the last step, your system's home screen will appear. Wait until the yellow stripe disappears and your system is ready.


3.2 Arming and disarming in the app
- Open the system in the Protegus 2 app. On the home screen every partition has its own card and padlock: a closed, red padlock means an armed partition, an open, green padlock a disarmed one.
- Tap the partition's padlock and select the required action: arm or disarm.
- If the app asks for it, enter the PIN code.
The padlock takes on the actual state in response to the event received from the alarm panel; the app also confirms in the event list and in a notification whether the panel has carried out the action.
With the SP3, after tapping the padlock you enter the panel's user code – the same four-digit code you use on the keypad, not the password of your Protegus 2 account. Each partition appears on a separate card, and you only see those for which the installer has given you permission. Besides full arming, you also start the partial modes from here: Stay and Sleep.

If the app shows something different from the keypad
If nothing happens after a command, or the app shows something completely different from the system's real state, open the Settings → System configuration menu and press the Sync button in the System out of sync? row. The app reads the panel's settings again.
3.3 Events and further users
- The event list is the system's log: arming, disarming with the user's name, alarms by zone, troubles and their restoral. After an alarm, this is where you see fastest which zone signalled.
- You can switch push notifications on and off by event type; the alarm arrives with a separate, conspicuous sound. You can also ask for notifications in a browser: Browser push notifications in the Protegus 2 app.
- Further users are invited by the system's owner from the app; the invited person sees the system from their own account, and you set their permissions (which partition, which output). The installer can also send invitations to the e-mail addresses entered in TrikdisConfig.
- The system's details (connection, signal strength, firmware) are shown on the system information page: The Protegus 2 system information page has been extended.
4. Operation with a Trikdis keypad
4.1 The Trikdis keypads
| Keypad | Display | Features |
|---|---|---|
| FLEXi LCD (SK-LCD TouchPad on docs.trikdis.com) | text display, 64 zones, 8 partitions | touch keys, date, time and temperature on the display, menu in several languages |
| FLEXi LED (SK-LED TouchPad) | 32 zone LEDs, 2 partitions | touch keys |
| SK-LCD Button | text display, 64 zones, 8 partitions | push buttons, icons; detailed description: SK-LCD Button short user manual |
| SK-LED Button | 16 zone LEDs, 2 partitions | push buttons; detailed description: SK-LED Button short user manual |
| SK232LED W (with Protegus label) | 32 zone LEDs, 2 partitions | the predecessor of the FLEXi LED; you operate it the same way as the FLEXi LED |
On the LED keypads the numbers are the zones: lit – the zone is open (violated), off – the zone is at rest, flashing – the zone or the user is selected, flashing rapidly – the zone caused an alarm. The state of the two partitions is shown by the indicators (ARM, SLEEP, STAY, OFF) in the top left and top right corners. With newer firmware the keypad can be assigned to one or two selected partitions: then it shows only their zones and state.

- 1 time (“Time”)
- 2 date (“Date”)
- 3 partition state (“Area status”) – in the picture “Armed: Area 1”, i.e. partition 1 is armed
- 4 navigation keys (“Navigation buttons”)
- 5 temperature (“Temperature”)
- 6 state of the panel's battery (“Battery status”)
- 7 partition control keys (“Area control buttons”): ARM, SLEEP, STAY, OFF

- 1 state indicators of partition 1 (“1 area status indications”)
- 2 zone indicators: numbers 1–32 indicate zones 1–32 (“Number indicators [1]-[32] match with 1-32 zones.”); lit – the zone is open (“Illuminated – zone violated”), off – the zone is monitored (“Extinguished – zone monitored”), flashing – zone or user selected (“Flashing – zone/user selected”), flashing rapidly – the zone caused an alarm (“Flashing intensively – zone was violated”)
- 3 power indicator (“Power indication”)
- 4 function keys (“Function keys”): ⚡, MEM, BYP, TRB
- 5 state indicators of partition 2 (“2 area status indications”)
- 6 partition control keys (“Area control buttons”): ARM, SLEEP, STAY, OFF

4.2 Keys and indicators
| Key | What it indicates, what it is for |
|---|---|
| ⚡ (lightning) | Lit steadily: the panel runs on mains power. Flashing: battery fault. Off: no mains power, the system runs on the battery. With this key you program user codes and reset the fire detectors. |
| MEM | Lit: there is an alarm in the memory. Flashing: you are viewing the alarm memory. The key takes you into the memory. (LED keypads) |
| BYP | Lit: there is a bypassed zone. Flashing: you are setting the bypass. The key takes you into bypass mode. (LED keypads) |
| TRB | Lit: there is a trouble in the system. Flashing: you are viewing the troubles. The key takes you into the trouble list. (LED keypads) |
| MENU, ▲ ▼ | The FLEXi LCD menu and scrolling. |
| 0–9 | Number entry: code, partition, zone, user number. |
| C | Exiting the mode, clearing the entered value. |
| OK | Confirming the selection. |
| ARM / SLEEP / STAY / OFF | Full arming / Sleep mode / Stay mode / disarming. |
Two rules for every keypad
- If you made a mistake, press the C key: it exits the mode and clears the entered value.
- If at least one zone is open (its LED is lit), the system cannot be armed – close the window or door, or bypass the zone (4.5). The installer can give some zones the “forced” (FORCE) attribute; these allow arming even when open.
4.3 Arming and disarming
If the system has only one partition, you do not need to press the partition number, and OK is also skipped. With several partitions, after entering the code the numbers of the partitions you can control light up.
| Action | Steps | What happens |
|---|---|---|
| Full arming | ARM → user code → partition number(s) → OK | The ARM indicator flashes during the exit delay, then is lit steadily. Leave the building during the exit delay and close the door. With Bell Squawk, the siren sounds once. |
| Stay mode | STAY → code → partition(s) → OK | The STAY indicator is lit. The mode is active immediately, without exit delay. With Bell Squawk, the siren sounds once. |
| Sleep mode | SLEEP → code → partition(s) → OK | The SLEEP indicator is lit. It is active immediately; opening the entrance door triggers the alarm immediately. With Bell Squawk, the siren sounds once. |
| Disarming | OFF → code → partition(s) → OK | The OFF indicator is lit. With Bell Squawk, the siren sounds twice. When entering, disarm during the entry delay: if the system is in ARM or STAY mode and someone enters, the entry delay starts, and the system must be disarmed before it expires. |
| Disarming after an alarm | code → partition(s) → OK | The system disarms, the OFF indicator is lit (with Bell Squawk, the siren sounds twice), MEM is lit, the zones that caused the alarm flash. The flashing is stopped with the MEM key, then the C key; the memory is cleared by the next arming. |
| Quick toggle (with a code, on a system that has STAY zones) | code → partition(s) | The selected partition switches to the opposite state: an armed one (in ARM, STAY or SLEEP mode) disarms, the OFF indicator is lit, with Bell Squawk the siren sounds twice; for a disarmed one the exit delay starts, and if you open the entry (delayed) zone in the meantime, it goes to ARM mode, otherwise to STAY mode – the corresponding indicator (ARM or STAY) lights up, with Bell Squawk the siren sounds once. |
On the FLEXi LED keypad, code → partition → OK is also enough for full arming; the FLEXi LCD shows the remaining exit delay time and the new state (Armed: Area 1, Disarmed: Area 1, Stay: Area 1, Sleep: Area 1) on the display.
4.4 Alarm memory (MEM)
After an alarm, the MEM indicator is lit. Press the MEM key: the lit numbers show which zones caused the alarm. Exit with the C key. If you do not press anything for one minute, the keypad exits by itself, but the memory is kept and MEM stays lit; the memory is cleared by the next arming, and then MEM goes off. On the FLEXi LCD keypad the alarm appears as text on the display, and you also find it in the Protegus 2 event list with the zone name.
4.5 Zone bypass (Bypass)
You can exclude a zone that has been left open or is faulty from monitoring for the next arming.
- FLEXi LED, SK232LED W: BYP → code (BYP flashes) → the two-digit numbers of the zones (for example
02, several zones one after another) → OK (BYP is lit steadily). - FLEXi LCD: MENU → 3 → code → the two-digit numbers of the zones → OK.
- SK-LCD Button, SK-LED Button: MENU → 6 → code → the two-digit numbers of the zones → OK.
To cancel the bypass, repeat the same steps. The bypass applies to one arming only: after disarming the zone is monitored again, and the fault must be repaired.
4.6 Resetting fire and smoke detectors
Two-wire fire and smoke detectors do not reset by themselves after an alarm, only manually. Hold down the ⚡ key for 3 seconds (on the Button keypads the C key): the panel briefly cuts the power to the detectors, and they return to their normal state. At this moment the PGM output switches to which the fire detectors are connected and which the installer has set to fire sensor reset (Fire sensor reset) operation; this is what resets the fire and smoke detectors connected to the panel's zone. The corresponding output in Protegus 2 and the FRS SMS command do the same.
4.7 Emergency keys
You can ask the monitoring station for help directly from the keypad – this works only if the system is connected to a monitoring station and you have agreed on the service.
| Keypad | Panic (police, immediate danger) | Medical help | Fire |
|---|---|---|---|
| FLEXi LCD, FLEXi LED, SK-LCD Button, SK-LED Button | hold down 1 for 3 seconds | hold down 4 for 3 seconds | hold down 7 for 3 seconds |
| SK232LED W | 1 + 3 together, for 3 seconds | 4 + 6 together, for 3 seconds | 7 + 9 together, for 3 seconds |
4.8 Trouble indication (TRB)
If TRB is lit, there is a trouble in the system (no mains power, battery, communication, tamper). On the LED keypads press the TRB key: the numbers of the trouble groups light up; you open the details of a group with its number, exit with the C key. The FLEXi LCD shows the Service [MENU]: Trouble line, and you open the trouble list with the MENU key. The meaning of the groups and what to do are in chapter 7.
4.9 User codes from the keypad
Adding a new code and changing an existing one work the same way; you choose the user's two-digit number (01–40): for a new code a number that is still free, for a change the number of the user whose code you are replacing. The C key cancels the operation at any time.
FLEXi LCD and SK232LED W (with the administrator code):
- Press the ⚡ key.
- Enter the six-digit administrator code (123456 by default). ⚡ starts flashing.
- Enter the user's two-digit number (for example
02). - Enter the four-digit user code, then once more.
- Press the numbers of the partitions the user may control.
- Press the OK key, then exit with the C key.
FLEXi LED (with the master code):
- Press the ⚡ key.
- Enter the four-digit master code (1234 by default; this is the code of user 01). The LEDs of the numbers that already have a code light up.
- Enter the user's two-digit number.
- Enter the new code twice.
- Press the numbers of the partitions that may be controlled, then the OK key. Exit: C twice.
SK-LCD Button, SK-LED Button: MENU → 0 → master code (1234 by default) → number → new code twice → partitions → OK → C.
Deleting a code: start the same way (⚡ or MENU → 0, administrator or master code), enter the number of the user to be deleted, then press the SLEEP key. The keypad beeps, the LED of the number goes off. Exit C (FLEXi LED: OK twice).
Changing the administrator and the master code
The administrator code can only be changed in the TrikdisConfig software – ask the installer. The master code is the code of user 01: on the FLEXi LED and the Button keypads you change it with the steps above, at number 01.
4.10 Partition states on the LED keypad
On the SK232LED W keypad, hold down the 2 key for 3 seconds (the keypad beeps): LEDs 1–8 show the state of the eight partitions – lit: armed, flashing: Stay mode, off: disarmed.
4.11 Brightness, sound, language
- FLEXi LCD: MENU → 5, then 2 for the volume, 4 for the display brightness, 3 for the key brightness; you set the value with the ▲ ▼ keys and save it with OK.
- FLEXi LED: hold down the C key for 3 seconds, then 1 / 4 – brightness of the zone LEDs, 2 / 5 – brightness of the keys, 3 / 6 – volume, 0 – switching the standby lighting on or off (if every second zone LED is lit, the standby lighting is off; if all are lit, it is on). The C key saves the setting.
- SK-LCD Button, SK-LED Button: from the MENU, the steps are in the two short manuals (4.1).

To change the language, enter the Menu with the MENU button, select the settings menu by pressing 5, then press 1 (language) for language selection.
After you have selected the required language, do not forget to save the setting with the OK button.
5. Operation with a Paradox keypad
The “FLEXi” SP3 works with the Paradox K10LED V/H, K636, K32LED, K32+, K32LCD+, K35 keypads and the TM50 / TM70 touchscreen keypads. The K10LED shows the state of 10 zones and 2 partitions, the K636 10 zones and 1 partition, the K32LED, K32+ and K35 32 zones and 2 partitions. The TM50 and TM70 can arm and disarm only the first two partitions.


5.1 Keys and indicators
| Key | What it indicates, what it is for |
|---|---|
| ⏻ (power symbol) | Programming user codes and resetting the fire detectors. |
| MEM | Lit: there is an alarm in the memory. Flashing: you are viewing the memory. The key takes you into the alarm memory. |
| BYP | Lit: there is a bypassed zone. Flashing: you are setting the bypass. The key takes you into bypass mode. |
| TBL | Lit: there is a trouble in the system. Flashing: you are viewing the troubles. The key takes you into the trouble list. |
| 0–9 | Number entry. |
| CLEAR | Exiting the mode, clearing the entered value. |
| ENTER | Confirming the selection. |
| ARM / SLEEP / STAY / OFF | Full arming / Sleep mode / Stay mode / disarming. |
| ∿ (power indicator) | Lit: running on mains power. Flashing: battery fault. Off: no mains power, the system runs on the battery. |
On the Paradox LED keypads the numbers are the zones (lit – open, flashing – caused an alarm); the top left and top right indicator groups show the state of partitions 1 and 2. If you made a mistake, CLEAR exits the mode and clears the entered value. With an open zone the system cannot be armed, unless the installer has given the zone the forced (FORCE) attribute.
5.2 Arming and disarming
With one partition, you do not need to press the partition number and ENTER. With several partitions, after entering the code the numbers of the partitions you can control light up.
| Action | Steps | What happens |
|---|---|---|
| Full arming | ARM → user code → partition(s) → ENTER | The ARM indicator flashes during the exit delay, then is lit. Leave the building, close the door. With Bell Squawk, the siren sounds once. |
| Stay mode | STAY → code → partition(s) → ENTER | The STAY indicator is lit. With Bell Squawk, the siren sounds once. |
| Sleep mode | SLEEP → code → partition(s) → ENTER | The SLEEP indicator is lit. With Bell Squawk, the siren sounds once. |
| Disarming | OFF → code → partition(s) → ENTER | The OFF indicator is lit. With Bell Squawk, the siren sounds twice. If the system is in ARM or STAY mode and someone enters, the entry delay starts: disarm the system before it expires. |
| Disarming after an alarm | code → partition(s) → ENTER | The system disarms, the OFF indicator is lit (with Bell Squawk, the siren sounds twice), MEM is lit, the zones that caused the alarm flash. The flashing is stopped with MEM, then CLEAR. |
| Quick toggle (with a code, on a system that has STAY zones) | code → partition(s) | An armed partition (in ARM, STAY or SLEEP mode) disarms, the OFF indicator is lit, with Bell Squawk the siren sounds twice; for a disarmed one the exit delay starts: if you open the entry zone in the meantime, it goes to ARM mode, otherwise to STAY mode – the corresponding indicator (ARM or STAY) lights up, with Bell Squawk the siren sounds once. |
5.3 Alarm memory, zone bypass, troubles
- Memory: MEM → the lit numbers are the zones that caused the alarm → CLEAR. After one minute of inactivity the keypad exits, the memory is kept and MEM stays lit; the next arming clears it, and then MEM goes off.
- Zone bypass: BYP → code (BYP flashes) → the two-digit numbers of the zones → ENTER (BYP is lit). Cancelling it works the same way. It applies to one arming.
- Troubles: TBL → the numbers of the trouble groups light up → the group number for the details → CLEAR. The meaning of the groups is in chapter 7.
5.4 Resetting fire detectors
Hold down the ⏻ key for 3 seconds: the panel briefly cuts the power to the fire detectors, and they return to their normal state. At this moment the PGM output switches to which the fire detectors are connected and which the installer has set to fire sensor reset (Fire sensor reset) operation; this is what resets the fire and smoke detectors connected to the panel's zone.
5.5 Emergency keys
Hold down the two keys together for 3 seconds: from the keypad you send a message to the monitoring station that help is needed or there is an immediate danger. It works only with a system connected to a monitoring station, and only if you use the monitoring service.
| Key pair | Message |
|---|---|
| 1 + 3 | Panic – immediate danger |
| 4 + 6 | Medical help |
| 7 + 9 | Fire |
5.6 Partition states on the LED keypad
Hold down the 1 and 2 keys together for 3 seconds (the keypad beeps): LEDs 1–8 show the state of the eight partitions – lit: armed, flashing: Stay mode, off: disarmed.
5.7 User codes from the keypad
New code and change:
- Press the ⏻ key.
- Enter the six-digit administrator code (123456 by default). ⏻ starts flashing.
- Enter the user's two-digit number (01–40): for a new code a number that is still free, for a change the existing one.
- Enter the four-digit user code, then once more.
- Press the numbers of the partitions that may be controlled.
- ENTER, then exit with CLEAR.
Deleting: ⏻ → administrator code → the user's number → SLEEP → CLEAR.
The administrator code is changed by the installer in the TrikdisConfig software. The duress code is described in section 2.3.
5.8 TM50 and TM70 touchscreen keypads
The TM50 and TM70 perform the same operations with the buttons on the screen, but they arm and disarm only the first two partitions. You switch the PGM outputs with one touch using the Utility key buttons on the screen (chapter 10). These keypads and the Paradox LCD keypads do not support the partition state query (5.6).
6. Operation with a Crow keypad
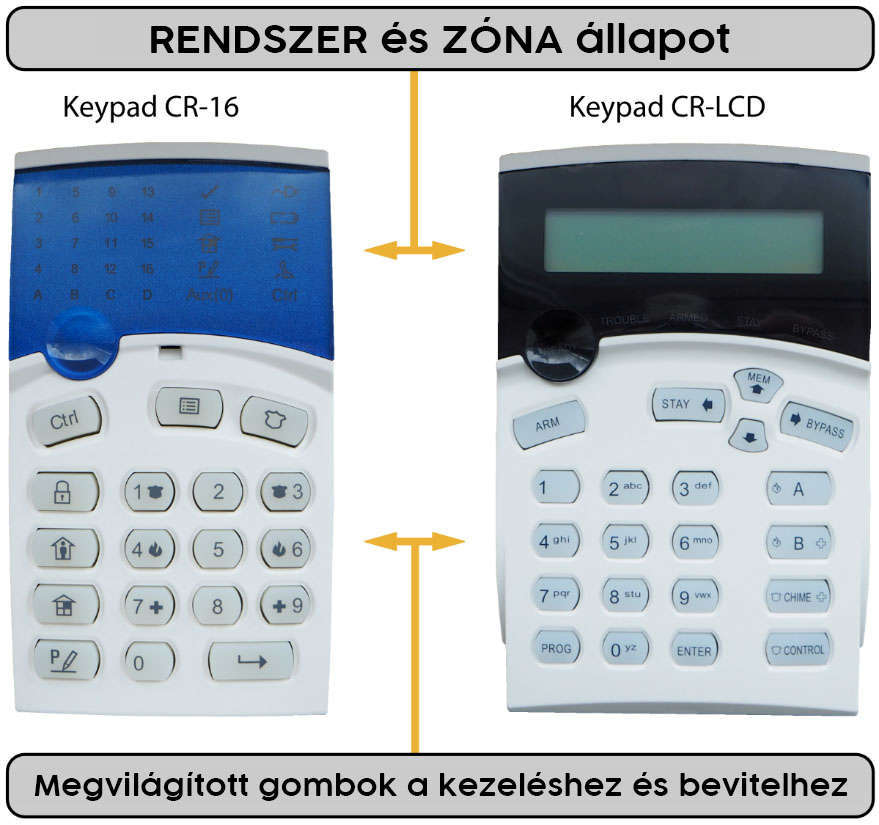
The Crow CR-16 (LED, with icons) and CR-LCD keypads show the state of 16 zones and 2 partitions. We no longer sell these keypads, but they continue to work with the SP3 in existing systems. From a Crow keypad three states are available: disarmed, armed and Stay; Sleep (SLEEP) mode cannot be started from them.
6.1 Keys and indicators
| Key | What it indicates, what it is for |
|---|---|
| Ctrl / CONTROL | The control menu: hold it down until the keypad beeps, then select a function with a number (fire detector reset, troubles, partition state, PGM). It flashes while you are in the menu. |
| MEM / MEMORY | Lit: there is an alarm in the memory. Flashing: you are viewing the memory. |
| PANIC (bell icon) | Panic signal. |
| ARM | Full arming. |
| STAY | Stay mode. |
| BYPASS | Lit: there is a bypassed zone. Flashing: you are setting the bypass. |
| PROG / PROGRAM | Programming (user codes, time). Flashes during programming. |
| 0–9 | Number entry. |
| ENTER | Confirmation; it is also how you exit the modes and clear an incorrect entry. |
With an open zone the system cannot be armed, except for forced (FORCE) zones.
6.2 Arming and disarming
With one partition, you do not need to press the partition number and ENTER.
| Action | Steps | What happens |
|---|---|---|
| Full arming | ARM → user code → partition(s) → ENTER | Leave the building during the exit delay. On the CR-LCD the ARMED indicator, on the CR-16 the A or B partition indicator is lit. With Bell Squawk, the siren sounds once. |
| Stay mode | STAY → code → partition(s) → ENTER | On the CR-LCD the STAY indicator, on the CR-16 the partition indicator is lit. With Bell Squawk, the siren sounds once. |
| Disarming | code → partition(s) → ENTER | The partition or state indicator goes off. With Bell Squawk, the siren sounds twice. |
| Disarming after an alarm | code → partition(s) → ENTER | MEM is lit, the zones that caused the alarm flash; the flashing is stopped with MEM, then ENTER. |
| Quick toggle | code → partition(s) | An armed partition disarms (with Bell Squawk, the siren sounds twice); for a disarmed one the exit delay starts: if you open the entry zone, it goes to armed mode, otherwise to Stay mode (with Bell Squawk, the siren sounds once). |
6.3 Alarm memory and zone bypass
- Memory: MEM → the lit numbers are the zones that caused the alarm → ENTER. After one minute of inactivity the keypad exits, the memory is kept; the next arming clears it.
- Zone bypass: BYPASS → code (BYPASS flashes) → the two-digit numbers of the zones → ENTER (BYPASS is lit). Cancelling it works the same way.
6.4 Resetting fire detectors
Hold down the Ctrl key until the keypad beeps, then press 0. The panel briefly cuts the power to the fire detectors, and they return to their normal state.
6.5 Emergency keys
Hold down the two keys together for 3 seconds. It works only with a system connected to a monitoring station.
| Message | CR-16 | CR-LCD |
|---|---|---|
| Panic | 1 + 3 | CHIME + CONTROL |
| Fire | 4 + 6 | A + B |
| Medical help | 7 + 9 | B + CHIME |
On the CR-16 keys the icons show the pairs: next to 1 and 3 the police officer, next to 4 and 6 the flame, next to 7 and 9 the cross.
6.6 Troubles
The CR-LCD shows the trouble on the display; on the CR-16 the TROUBLE indicator is lit. For the details, hold down the Ctrl key until it beeps (Ctrl flashes), then press 9: the numbers of the trouble groups light up, the group number shows the details, exit with ENTER. The meaning of the groups is in chapter 7.
6.7 Partition states (CR-16)
Hold down the Ctrl key until it beeps, then press 1: LEDs 1–8 show the state of the eight partitions – lit: armed, flashing: Stay mode, off: disarmed.
6.8 User codes from the keypad
Programming requires the six-digit installer or administrator code (the administrator code is 123456 by default; the installer changes it in TrikdisConfig).
| Step | CR-16 | CR-LCD |
|---|---|---|
| 1 | PROG | PROG |
| 2 | six-digit administrator code | six-digit administrator code |
| 3 | 0 1 | – |
| 4 | the user's two-digit number (01–40) | the user's two-digit number (01–40) |
| 5 | ENTER | – |
| 6 | four-digit user code, then once more | four-digit user code, then once more |
| 7 | the numbers of the partitions that may be controlled | the numbers of the partitions that may be controlled |
| 8 | ENTER (save), ENTER (exit) | ENTER (save), ENTER (exit) |
Deleting: start the same way (CR-16: PROG → code → 0 1 → number → ENTER; CR-LCD: PROG → code → number), then ARM → ENTER (delete) → ENTER (exit).
Changing the user's partitions (CR-LCD): PROG → code → ▲ (MEM) → number → ENTER → partitions → ENTER → ENTER.
6.9 Time and date on the CR-LCD keypad
PROG → six-digit administrator code → ▼ → ENTER → hours and minutes (HHMM) → day, month, year (DDMMYY) → PROG → ENTER.
7. Trouble signals
If there is a trouble in the system, the keypad's TRB indicator (Paradox: TBL, Crow: TROUBLE) is lit, the FLEXi LCD shows the Service [MENU]: Trouble line, and Protegus 2 also sends an event. A trouble is not an alarm: the system keeps working, but something needs to be put right.
Opening the troubles on the keypad:
- Trikdis LED and Paradox keypad: TRB / TBL → the lit numbers are the trouble groups → the group number for the details → C / CLEAR.
- FLEXi LCD: MENU, then the trouble list on the display.
- Crow: hold down the Ctrl key until it beeps → 9 → the group number → ENTER.
7.1 The trouble groups
| Group | Number | Trouble | What you can do |
|---|---|---|---|
| 1 – System | 1 | No mains (230 V) power. | Check the circuit breaker and the plug; if there is power in the house, call the installer. During a power cut the system runs on the battery. |
| 2 | Battery fault (discharged, old or missing). | Installer: checking and replacing the battery. | |
| 3 | The panel's clock is not set. | Happens after a longer power cut; it is set by the installer or – on a modem version – by the TIME SMS command (chapter 9). |
|
| 4 | The AUX (auxiliary power) output is overloaded. | Installer. | |
| 5 | The siren output is overloaded. | Installer. | |
| 6 | No siren (the siren circuit is broken). | Installer. | |
| 7 | Fire detector loop fault. | Installer. | |
| 2 – Communication | 1 | No connection with the monitoring station's main receiver (regardless of the connection type). | Check the internet (router, cable) and the signal strength; if it persists, call the installer or the monitoring station. |
| 2 | No connection with the monitoring station's backup receiver (regardless of the connection type). | The same. | |
| 3 | No connection with the Protegus cloud (regardless of the connection type). | Internet, router; on the modem version the SIM and the signal strength. | |
| 4 | No SIM card. | Installer (the SIM is in the enclosure). | |
| 5 | Wrong SIM PIN code. | Installer. | |
| 6 | Cannot connect to the mobile network. | Signal strength, whether the SIM subscription is active (balance, expiry). | |
| 7 | Cannot connect to the Wi-Fi network. | Whether the router works, whether the Wi-Fi name or password has changed; the panel sees only 2.4 GHz networks. | |
| 8 | E485 Ethernet module connection fault. | Installer (the module's LED shows the details). | |
| 3 – Zone tamper | zone number | The cover of the detector of the given zones has been opened or its wire has been cut. | Check the detector; if the cover is closed, installer. |
| 4 – 485 bus | expander number | The expander with the given number (iO module, wireless receiver) does not respond. | Installer. |
| 5 – Missing wireless detector | number | A wireless detector has not checked in within the supervision time. The number is its position in the RF table. | Check that the detector is in place and its battery has not been removed; then installer. |
| 6 – Wireless detector battery | number | A wireless detector has signalled that its battery will soon be flat. The detector's number is its position in the RF table. | Battery replacement (agreed with the installer if the detector is tamper-protected). |
| 7 – Anti-masking | zone number | The detector of the given zones has been covered or sprayed over (anti-masking). | Remove the obstruction; if it persists, installer. |
When to call the installer
You can often fix a mains power (1-1), Wi-Fi (2-7) or mobile network (2-6) trouble yourself. If the trouble is still there after an hour, or you see another row of the list, call the installer – tell them the trouble number and the keypad type. The trouble indication disappears by itself as soon as the trouble is gone.
8. iButton key and RFID card
With a key or a card, everyday use is even simpler than with the keypad: one touch on the reader next to the entrance, and the system switches to the opposite state. You arm and disarm without a code; write down who has a key or card on the data sheet in chapter 12.
8.1 iButton key
With the iButton key you switch between the armed, Stay and disarmed states; Sleep (SLEEP) mode cannot be started with a key. With an open zone the system cannot be armed with a key either.
Touch the key to the reader. If the system was armed, it disarms. If it was disarmed, it arms and the exit delay starts: if you open the entry (delayed) zone during it, the system goes to fully armed mode; if you do not open it and there are Interior STAY or Instant STAY zones, it goes to Stay mode.
Adding and deleting keys – also for a system that is already installed and working – in the TrikdisConfig software (installer) or on the CZ-Dallas reader itself:
- If the key list is empty, touch the first key to the “eye” of the reader and hold it there for 3 seconds: this becomes the master key, in the first row of the list.
- For the adding mode, hold the master key to the reader for at least 10 seconds.
- Touch the user keys to the reader one by one.
- At the end, touch the master key to the reader again: this closes the adding mode.
- To delete all keys (including the master key), hold the master key to the reader for at least 20 seconds.
If a key is lost
The installer deletes keys one by one in TrikdisConfig; on the reader only all keys can be deleted at once. If a key is lost, ask for it to be deleted, and add the remaining keys again.
8.2 RFID card
The RFID card needs a Wiegand (26/34) reader connected to the system, which often has a numeric keypad as well. The cards are added by the installer with the identifier entered in the TrikdisConfig Tag code field; cards and keys are on a common list.
With a card you switch between the armed, Stay and disarmed states. Hold the card to the reader, or enter your user code on the reader's keypad and press the # key. The system switches to the opposite state, the same way as with the iButton key: from armed to disarmed, from disarmed – after the exit delay – to armed or Stay: if you do not open the delayed entry zone during the exit delay and there are Interior STAY or Instant STAY zones, it goes to Stay mode, otherwise to fully armed mode. With an open zone it cannot be armed with a card either.
9. Control by phone: SMS and call
Only the versions with a mobile network modem (WiFi + 2G, WiFi + 4G, Ethernet + 4G) can be controlled by SMS and phone call, and only with a working SIM card; the Wi-Fi-only and Ethernet-only panels cannot. You send the SMS and make the call to the number of the panel's SIM card – you get this number from the installer; write it on the data sheet in chapter 12.
9.1 SMS commands
By SMS you control the panel and can also change some of its settings; all settings of the panel can only be changed with the TrikdisConfig software. Every message has the same structure:
Command space Password space Data
The password is the six-digit SMS password, 123456 by default. On the first day, change it with the PSW command (or ask the installer) to a combination that only you know – and do not forget it – and do not give out the panel's phone number unnecessarily either: whoever knows the number and the password controls the system. The data field depends on the command; for several commands it is empty. The commands work in both lower case and upper case.
Who can send commands?
The administrator can control the panel by SMS and by call. If you want to authorize another user as well, their phone number is added by the installer in TrikdisConfig, or by you with the SETN command. The panel sends its replies with the texts set by the installer.
| Command | Data | What it does | Example |
|---|---|---|---|
| INFO | – | Status query: object name, partition states, IMEI, signal strength, firmware version, serial number. | INFO 123456 |
| RESET | – | Restarts the panel. | RESET 123456 |
| OUTPUTx | ON | Switches output x on. | OUTPUT1 123456 ON |
| OFF | Switches output x off. | OUTPUT1 123456 OFF |
|
| PULSE=ttt | Switches output x on for ttt seconds (three digits). | OUTPUT1 123456 PULSE=002 |
|
| PSW | new password | Changes the SMS password. | PSW 123456 654123 |
| TIME | YYYY/MM/DD,hh:mm:ss | Sets the date and time. | TIME 123456 2026/10/30,10:02:00 |
| TXTA | object name | Sets the object name (this appears in the reports). | TXTA 123456 Home |
| RDR | phone number#text | The panel forwards the text after the # by SMS to the specified number. The number starts with a + sign and the country code. | RDR 123456 +36301234567#forwarded text |
| ASKI | – | State of the inputs (IN) by SMS. | ASKI 123456 |
| ASKO | – | State of the outputs (OUT) by SMS. | ASKO 123456 |
| ASKA | – | State of the partitions by SMS. | ASKA 123456 |
| ASKT | – | Values of all temperature sensors by SMS. | ASKT 123456 |
| ARM | SYS:x | Arms partition x (1–8). | ARM 123456 SYS:1 |
| DISARM | SYS:x | Disarms partition x (1–8). | DISARM 123456 SYS:1 |
| STAY | SYS:x | Arms partition x in Stay mode (1–8). | STAY 123456 SYS:1 |
| SLEEP | SYS:x | Arms partition x in Sleep mode (1–8). | SLEEP 123456 SYS:1 |
| FRS | – | Resets the power of the fire detectors, if an output is defined as Fire Sensor Reset. | FRS 123456 |
| SETN | PhoneX=number#name#e-mail | Adds a user in row x with phone number, name and e-mail address; the phone number and the name are separated by a # sign. The number starts with a + sign and the country code. | SETN 123456 PHONE5=+36301234567#JOHN#john@example.com |
| PhoneX=DEL | Deletes the phone number and name in row x. | SETN 123456 PHONE5=DEL |
|
| UUSD | *code# | Sends a USSD code to the mobile operator (for example a balance query). The command name appears in the panel exactly like this, as UUSD. | UUSD 123456 *245# |
| CONNECT | Protegus=ON | Connects to the Protegus cloud. | CONNECT 123456 PROTEGUS=ON |
| Protegus=OFF | Disconnects from Protegus. | CONNECT 123456 PROTEGUS=OFF |
|
| Code=123456 | The access code of the Protegus cloud (Cloud access code). | CONNECT 123456 CODE=123456 |
|
| IP=address:port | IP address and port of the main monitoring channel. | CONNECT 123456 IP=0.0.0.0:8000 |
|
| IP=0 | Disables the main channel. | CONNECT 123456 IP=0 |
|
| ENC=123456 | TRK encryption key. | CONNECT 123456 ENC=123456 |
|
| APN=name | The APN name of the SIM card. | CONNECT 123456 APN=INTERNET |
|
| USER=name | APN user name. | CONNECT 123456 USER=User |
|
| PSW=password | APN password. | CONNECT 123456 PSW=Password |
The two most useful commands
INFO 123456 – the panel replies: object name, the state of the partitions, signal strength, firmware; from this you see that the SIM is active and the panel accepts commands. ASKA 123456 – the state of the partitions, before you arm by call or SMS. (Replace 123456 with your own SMS password.)
9.2 Control by phone call
By call you arm the partitions (in full or Stay mode) and disarm them, and you control the outputs; Sleep mode cannot be started by call. Conditions:
- Your phone number is on the panel's user list (installer or
SETNcommand), and the installer has enabled partition or output control for you. - The output you want to control is set for remote control (Remote control); for pulse switching the pulse time too – the installer sets this in the TrikdisConfig PGM table.
Call the number of the panel's SIM card. If your number is on the list, the panel answers the call; then dial the command on the phone's keypad:
| Keys | Function | Example |
|---|---|---|
| [1][partition][#] | Arms the specified partition. | 12# – arms partition 2 |
| [2][partition][#] | Disarms the specified partition. | 22# – disarms partition 2 |
| [3][output][#][state] | Controls the specified output. State: 0 – off, 1 – on, 2 – off for the pulse time, 3 – on for the pulse time. | 31#1 – switches output 1 on; 32#3 – switches output 2 on for the pulse time |
Before calling, it is worth requesting the state of the partitions (ASKA) and the zones (ASKI) by SMS: with an open zone the system cannot be armed by call either (except for forced zones). If the Re-ARM function is switched on and nobody opens the entry zone during the entry delay after disarming by call, the panel returns to the previous armed mode (2.3).
Voice call on alarm
Current firmware versions do not call with a voice message on alarm; you are notified of the alarm by the Protegus 2 push message and – on the modem version – by SMS. Only the old SP3_12xx panels, with firmware up to 1.13, could make voice calls.
10. Controlling outputs (PGM) from the keypad
You can switch the devices connected to the panel's programmable outputs (gate, lighting, heating, irrigation) from Protegus 2 at any time, and on the modem version also by SMS (OUTPUTx) and by call (chapter 9). From the keypad they are switched by the shortcut keys: the installer assigns the output and the operation to the shortcut keys in TrikdisConfig (PGM → Control) – two-state (Level, switches on and off) or pulse (Pulse, switches on for the set time). If no output is assigned to a shortcut key, pressing it does nothing.
| Shortcut key | Paradox TM50 / TM70 (touch) | Paradox LED and LCD keypad (held for 3 s) | Trikdis SK232LED W (held for 5 s) |
|---|---|---|---|
| 1 | Utility key 1 | 1 + 2 | 2 |
| 2 | Utility key 2 | 4 + 5 | 5 |
| 3 | Utility key 3 | 7 + 8 | 8 |
| 4 | Utility key 4 | 2 + 3 | 3 |
| 5 | Utility key 5 | 5 + 6 | 6 |
| 6 | Utility key 6 | 8 + 9 | 9 |
On the Paradox LED keypads and the SK232LED W, shortcut key 1 also shows the state of the partitions (4.10 and 5.6); the Paradox LCD keypads and the TM50 / TM70 do not support this function.
On a Crow keypad: hold down the Ctrl key until the keypad beeps, then press the output number from 2 to 8 – the assigned output switches.
FLEXi LCD, FLEXi LED, SK-LCD Button, SK-LED Button: switch the outputs from Protegus 2; these keypads have no output shortcut keys.
11. Frequently asked questions
I cannot arm: the keypad beeps, or a zone LED is lit
A zone is open – a window, a door, or a motion detector still sees movement. Close it, wait a few seconds and try again. If the zone is faulty (the detector is stuck, the wire is damaged), bypass it for one arming (4.5, 5.3, 6.3) and call the installer. The FLEXi LCD shows the open zone on the display.
There was an alarm – how do I know which zone signalled?
On the keypad MEM is lit: press it, and the lit numbers are the zones that caused the alarm (4.4, 5.3, 6.3). The Protegus 2 event list shows the same with the zone name and the time, and the monitoring station sees it too. The memory is cleared by the next arming.
I forgot my code
Your own code cannot be “looked up”, but a new one can be given: on the Trikdis SK232LED W, the FLEXi LCD and the Paradox keypad with the administrator code, on the FLEXi LED and the Button keypads with the master code (4.9, 5.7, 6.8), or by the installer in TrikdisConfig. If you do not know the administrator code either, the installer can change it.
Protegus 2 shows something different from the keypad
In the app, open the Settings → System configuration menu and press the Sync button in the System out of sync? row (3.2). If the panel still does not react to commands, check the trouble indication on the keypad: trouble 3 of group 2 means the missing Protegus connection (chapter 7).
There is a power cut – what happens?
The system keeps running on the battery, the keypad's TRB indicator is lit (group 1, trouble 1), Protegus 2 sends an “AC fault” event. When the mains power returns, the trouble disappears by itself and the battery recharges. If the ⚡ key (Paradox: the power indicator) flashes, the battery is faulty – call the installer.
The fire detector triggered an alarm and does not reset
Two-wire smoke detectors can only be reset manually: hold down the ⚡ key for 3 seconds (on a Button keypad the C key; Paradox: ⏻ for 3 seconds; Crow: Ctrl, then 0). On a modem version the FRS SMS command does it too (4.6, 5.4, 6.4). Air the room first, so that it does not trigger again.
Can I get an SMS or a call on alarm?
Only the modem versions send SMS, to up to eight phone numbers added by the installer. Current panels do not make voice calls; the fastest notification is the Protegus 2 push message, which works on every version (1.3, 9.2).
How many users can there be, and how many keys or cards?
The panel stores up to 40 user codes, and the same number of iButton keys or RFID cards. A user can have both a code and a key. The log and Protegus 2 show by the user's name who armed or disarmed, so every user should have their own code (2.2).
Accented characters are displayed incorrectly on the FLEXi LCD keypad
The character set is set by the installer in TrikdisConfig:
You can also change the language of the keypad's menu yourself (4.11).
Which keypad should I buy for an existing SP3?
The Trikdis keypads available in the shop: FLEXi LCD (text display, 8 partitions), FLEXi LED (32 zone LEDs, 2 partitions), SK-LCD Button and SK-LED Button (push-button). One bus can have at most eight keypads of the same type; the installer connects them. The product cards are at the bottom of the page.
12. Your system's data
Print this chapter, fill it in together with the installer, and keep it in a safe place – not next to the keypad. Do not write any codes on it, only which user and which key or card belongs to which number; this way the row of a lost key or of a user who leaves can be deleted immediately.
Users, keys, cards
The administrator code has been changed: ☐ yes · The SMS password has been changed: ☐ yes
| Number | User | Key / card | Partitions | Number | User | Key / card | Partitions |
|---|---|---|---|---|---|---|---|
| 01 (master) | 21 | ||||||
| 02 | 22 | ||||||
| 03 | 23 | ||||||
| 04 | 24 | ||||||
| 05 | 25 | ||||||
| 06 | 26 | ||||||
| 07 | 27 | ||||||
| 08 | 28 | ||||||
| 09 | 29 | ||||||
| 10 | 30 | ||||||
| 11 | 31 | ||||||
| 12 | 32 | ||||||
| 13 | 33 | ||||||
| 14 | 34 | ||||||
| 15 | 35 | ||||||
| 16 | 36 | ||||||
| 17 | 37 | ||||||
| 18 | 38 | ||||||
| 19 | 39 | ||||||
| 20 | 40 |
Zones
| Zone | Room / area | Zone type | Zone | Room / area | Zone type |
|---|---|---|---|---|---|
| 01 | 17 | ||||
| 02 | 18 | ||||
| 03 | 19 | ||||
| 04 | 20 | ||||
| 05 | 21 | ||||
| 06 | 22 | ||||
| 07 | 23 | ||||
| 08 | 24 | ||||
| 09 | 25 | ||||
| 10 | 26 | ||||
| 11 | 27 | ||||
| 12 | 28 | ||||
| 13 | 29 | ||||
| 14 | 30 | ||||
| 15 | 31 | ||||
| 16 | 32 |
Zone type, for example: delayed (entrance), instant, interior (Interior STAY), fire, 24-hour, panic.
Partitions and outputs
| Partition | What belongs to it | Output (PGM) | What it switches | Shortcut key |
|---|---|---|---|---|
| 1 | 1 | |||
| 2 | 2 | |||
| 3 | 3 | |||
| 4 | 4 | |||
| 5 | 5 | |||
| 6 | 6 | |||
| 7 | 7 | |||
| 8 | 8 |
Temperature sensors
| Sensor | Room / area | Minimum temperature | Maximum temperature |
|---|---|---|---|
| 1 | |||
| 2 | |||
| 3 | |||
| 4 | |||
| 5 | |||
| 6 | |||
| 7 | |||
| 8 |
Times, emergency keys, contacts
| Setting | Value |
|---|---|
| Entry delay | ______ seconds |
| Exit delay | ______ seconds |
| Siren duration | ______ minutes |
| Emergency – panic | ☐ enabled |
| Emergency – medical | ☐ enabled |
| Emergency – fire | ☐ enabled |
| Short siren signal (Bell Squawk) | ☐ enabled |
| Duress code | ☐ last digit +1 · ☐ first digit 0 |
| Contact | Name | Phone number | Note |
|---|---|---|---|
| Monitoring station | customer number, password (agreed verbally) | ||
| Installer | |||
| Number of the panel's SIM card | modem versions only | ||
| The panel's IMEI/Unique ID number | for Protegus 2; on the sticker of the box |